Mike_Block

vip
On-chain Analyst
Memecoin Hunter
Futures Trading Strategist
Crypto Trader | Market Hunter | Turning charts into profits | DeFi • NFTs • Bitcoin • Altcoins | Follow for daily market moves
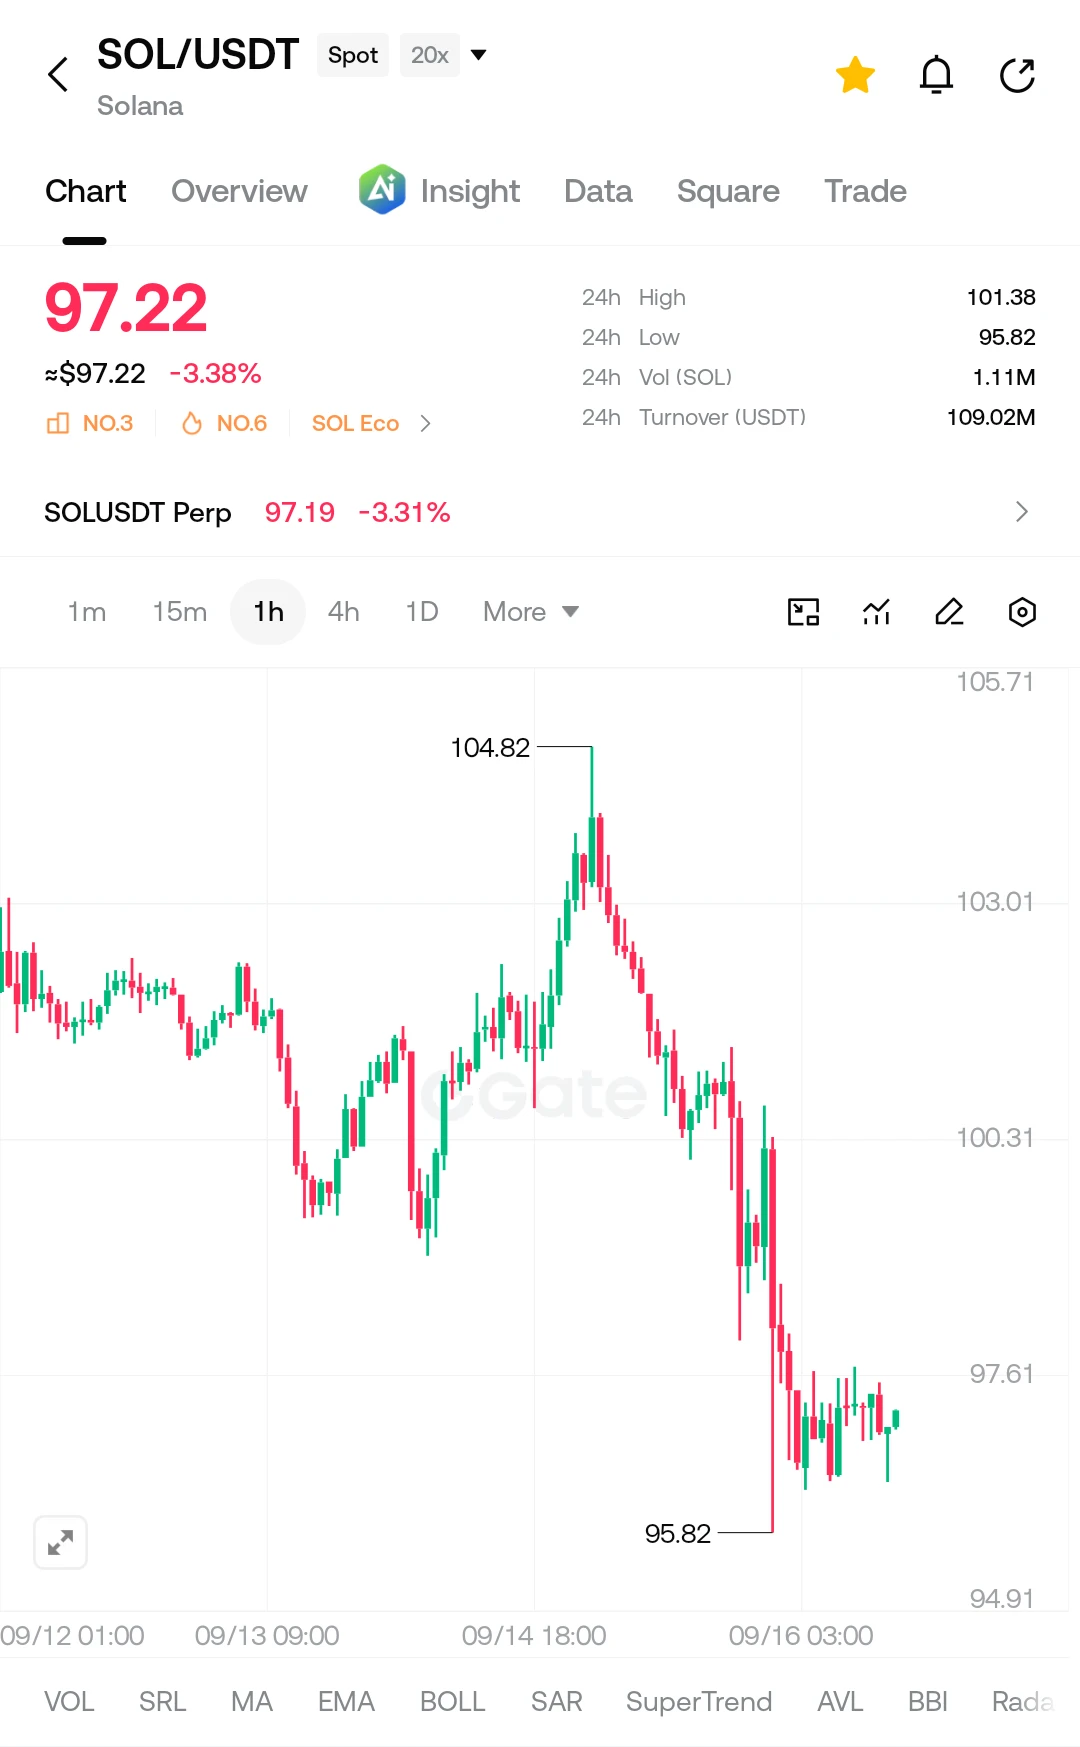
I’m watching $SOL closely here 👀
The 1H chart looks weak after that sharp drop from 104.82, but SOL is now trying to stabilize around the 96–97 area. I’d rather wait for a clean rejection or confirmation before jumping in.
SOL/USDT setup
Entry Zone: 97.20 – 97.70
TP1: 96.40
TP2: 95.85
TP3: 95.20
Stop Loss: 98.40
My focus is simple: if price keeps getting rejected below 98, sellers could push for another test of the recent low. I won’t chase the move though — confirmation matters.
Trade with controlled risk. This is a chart-based setup, not a guarantee.
$SOL ‌
#BTCDrops3.3% #OpenAISeeks1.2Tri
post-image
SOL-3.41%
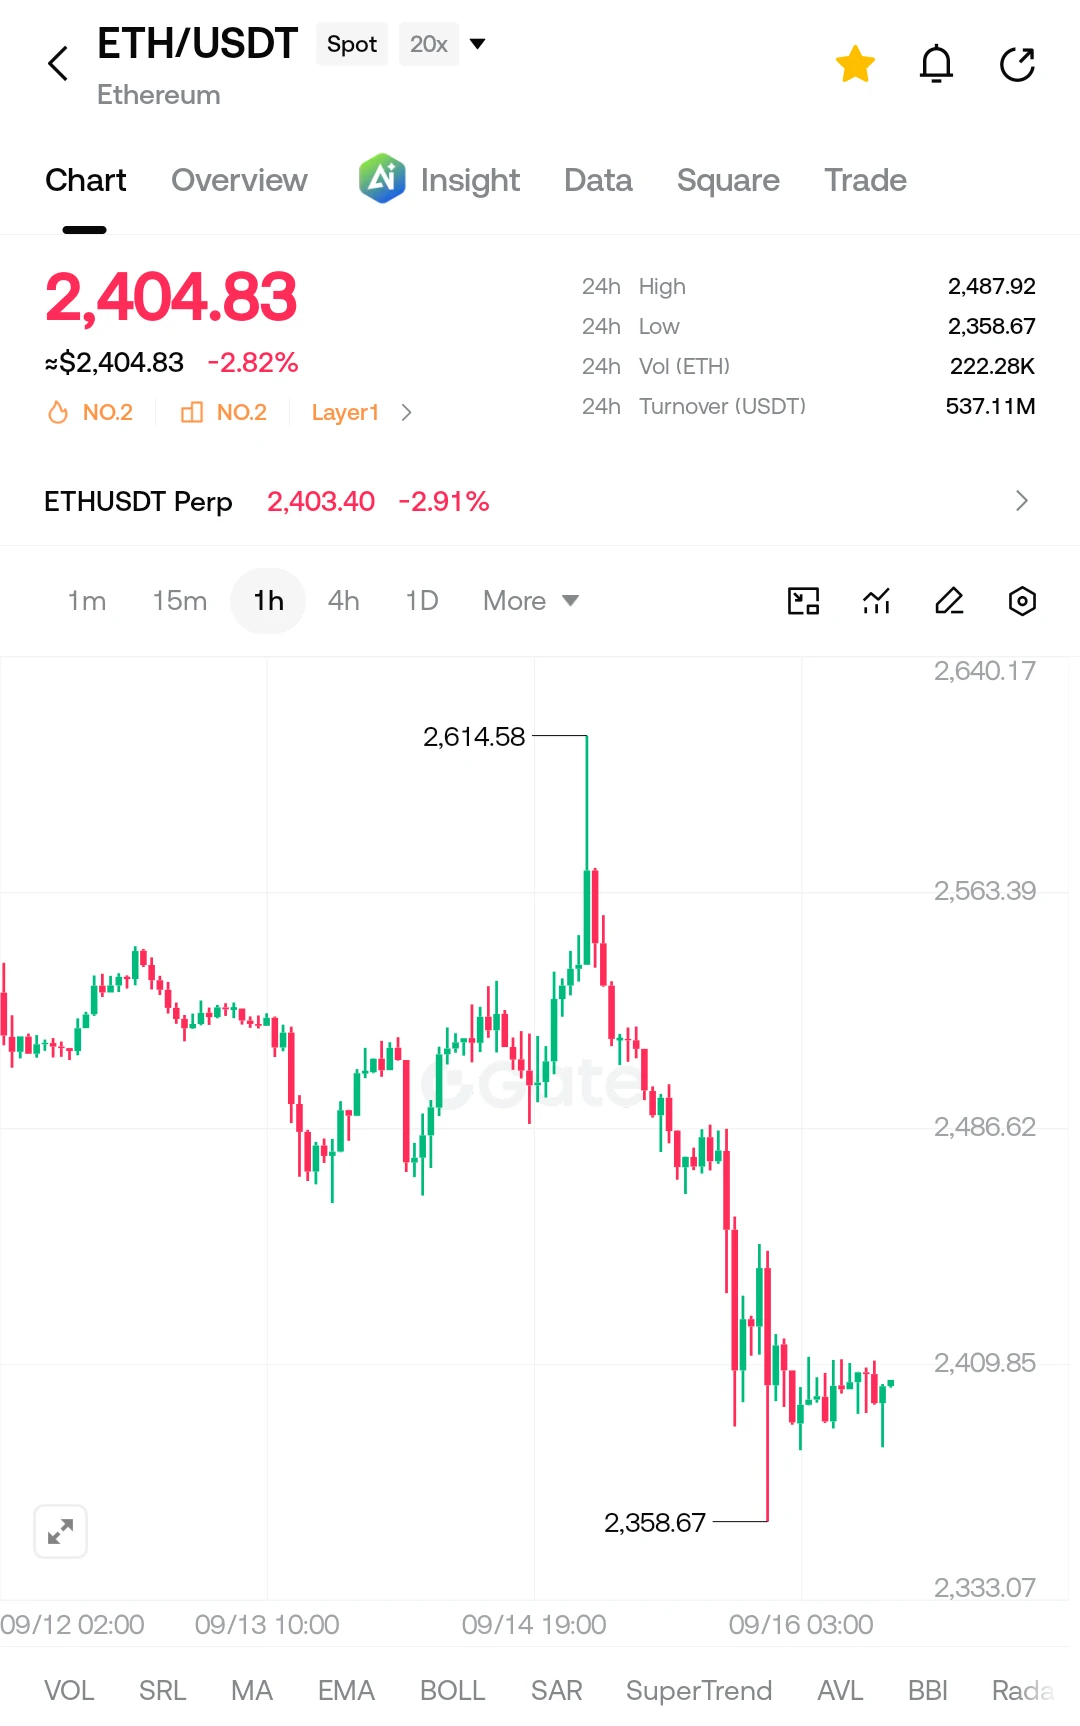
I’m watching $ETH closely here because the chart has just gone through a sharp selloff, and now price is trying to stabilize around $2,400. I don’t want to chase the move — I’m watching the next rejection for confirmation.
ETH USDT Setup
Entry Zone: $2,405 – $2,425
TP1: $2,385
TP2: $2,360
TP3: $2,335
Stop Loss: $2,455
The $2,358 area is the key recent low. If sellers regain control below that zone, the downside can open further. If ETH instead reclaims $2,425–$2,450 strongly, I’d avoid forcing the short.
Pro tip: Wait for confirmation before entering and keep risk small. This is a chart-based
post-image
ETH-2.94%
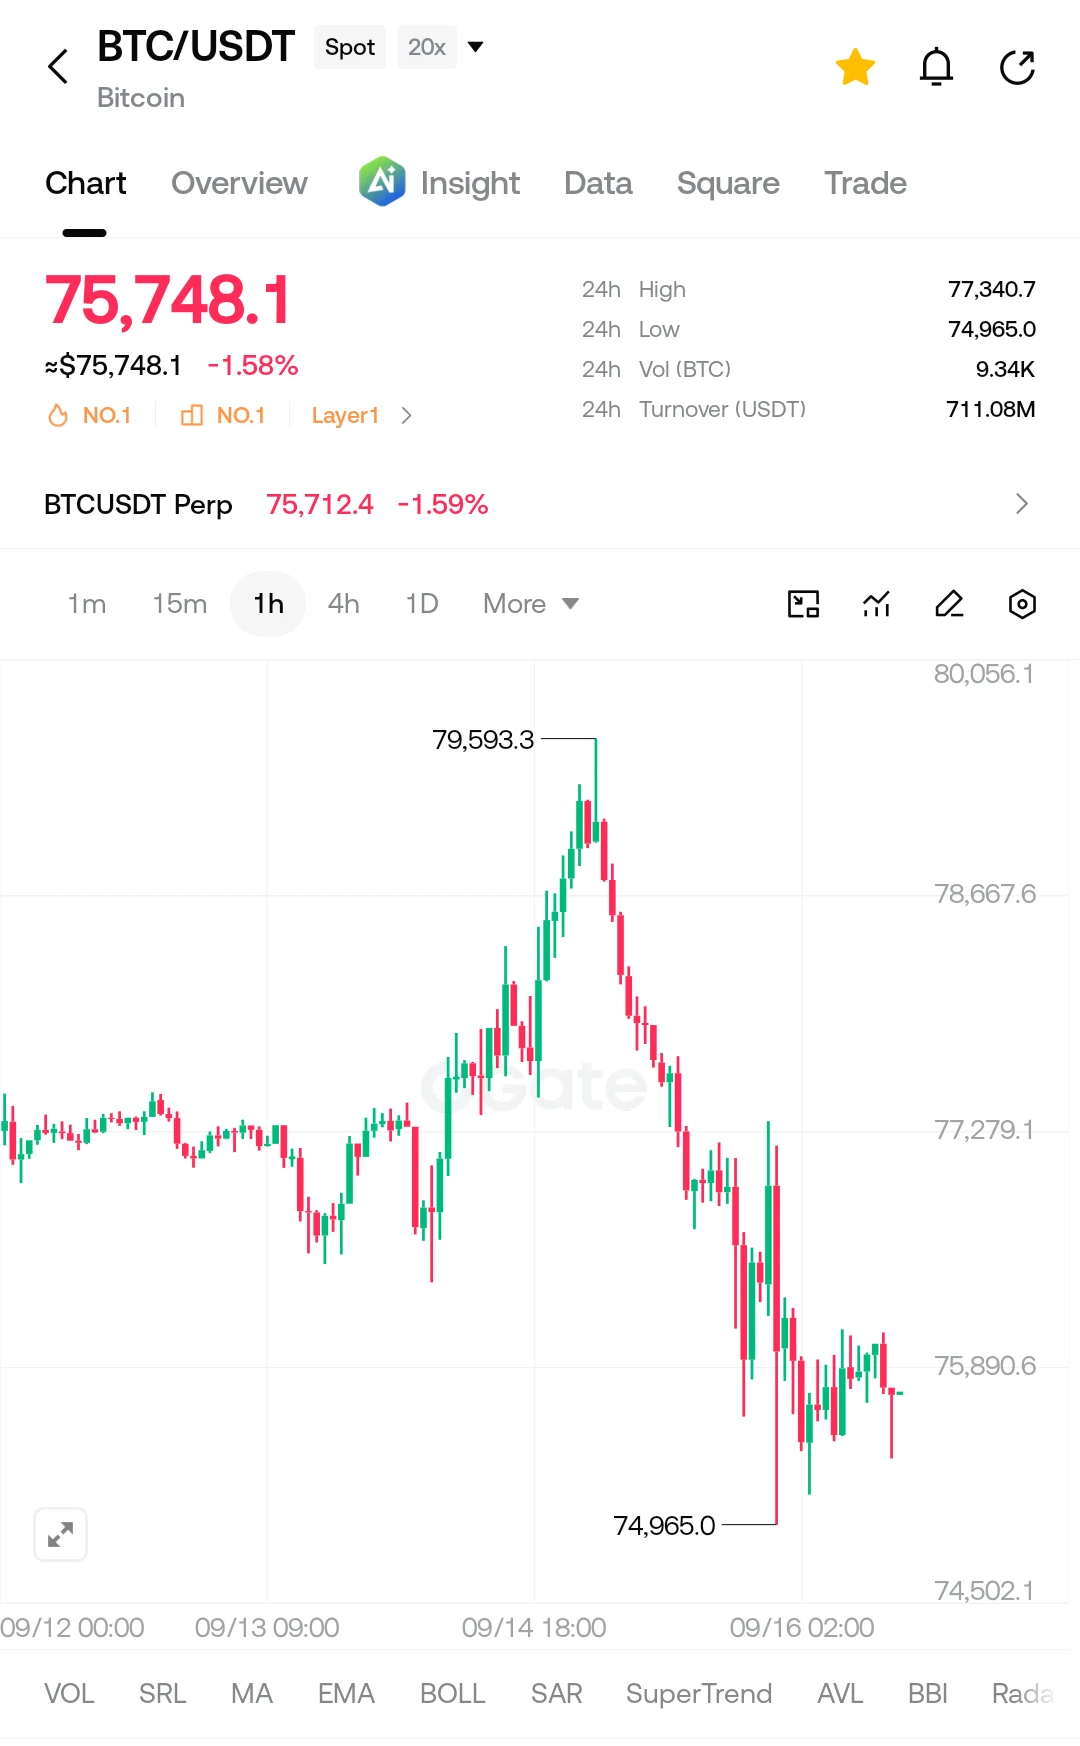
I’m watching $BTC closely here, and the 1H chart is showing a clear rejection from the 79.5K area. Price has fallen sharply and is now trying to stabilize around 75.7K.
For me, the key is whether BTC can reclaim the nearby resistance or continues making lower highs.
BTC USDT 1H Setup
🔹 Entry Zone: 75,700 – 76,000
🎯 TP1: 75,300
🎯 TP2: 74,965
🎯 TP3: 74,500
🛑 Stop Loss: 76,450
Pro Tip: I’d avoid chasing a candle. Let the entry zone confirm first, because the 74,965 area has already acted as strong support. If BTC reclaims 76.4K with strength, this short setup becomes weaker.
Risk management
post-image
BTC-1.49%
I’m watching $BTC closely here — the chart is getting interesting.
BTC/USDT is holding around 77,356 after a sharp rejection from 79,874 and a strong recovery from 76,022. On the 1H chart, price is starting to stabilize, so I’m watching for a clean confirmation before getting aggressive.
BTC/USDT LONG SETUP
Entry Zone: 77,050 – 77,450
TP1: 77,950
TP2: 78,400
TP3: 78,900
TP4: 79,300
TP5: 79,850
TP6: 80,500
Stop Loss: 76,000
The key battle is around 77K–78K. If BTC holds the entry zone and starts printing higher highs on the 1H, momentum could push back toward the previous 79,874 resistance.
I’m
post-image
BTC-1.49%
I’m watching $ETH closely right now the chart looks like it’s building another move.
ETH/USDT just made a sharp push toward 2,666, pulled back hard, and is now recovering around 2,534. What catches my attention is the way price is starting to climb again after that violent rejection.
Here’s the setup I’m watching:
ETH/USDT — LONG BIAS
Entry Zone: 2,515 – 2,535
TP1: 2,555
TP2: 2,580
TP3: 2,615
TP4: 2,640
TP5: 2,666
TP6: 2,690
Stop Loss: 2,480
The key for me is confirmation around the entry zone. If ETH holds this area and buyers keep stepping in, the previous high around 2,666 becomes an impor
post-image
ETH-2.94%
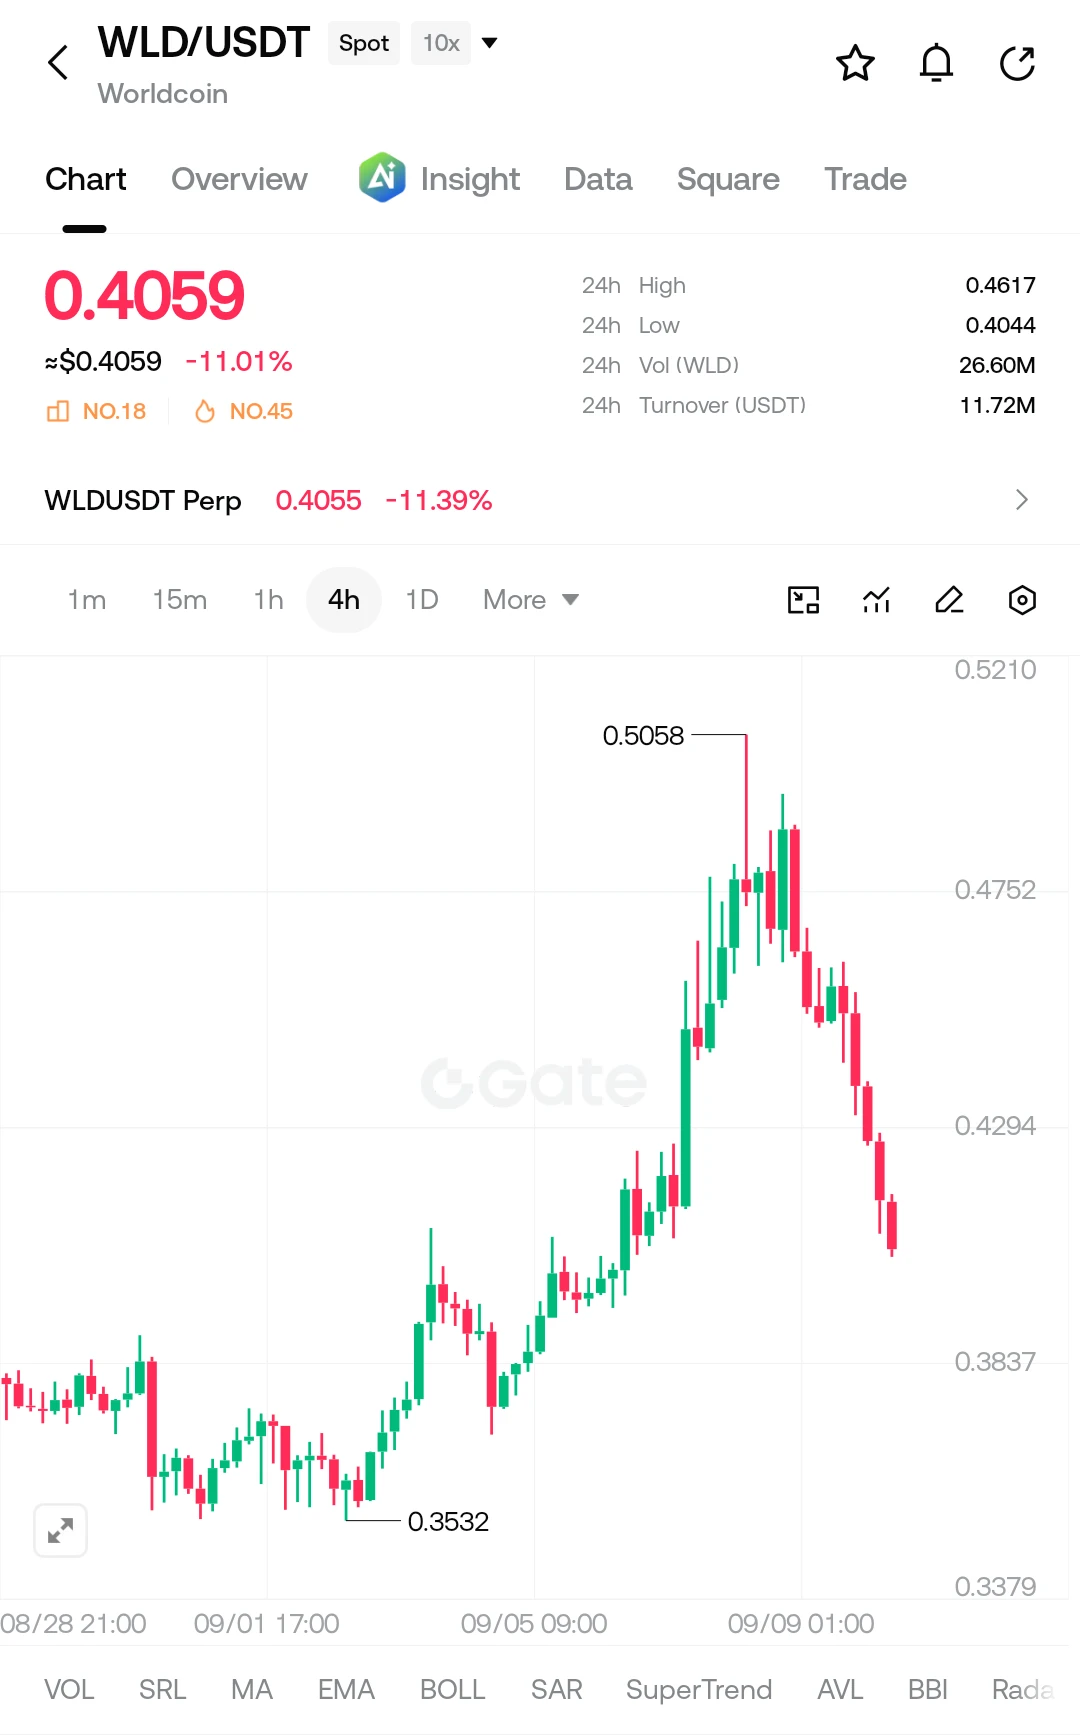
I’m watching $WLD /USDT closely here. The chart has taken a serious hit, dropping over 11% and now sitting near a level where buyers could try to fight back.
I’m not interested in chasing the red candles. I’m watching the 0.4000–0.4100 area for a proper reaction and confirmation before considering the move.
WLD/USDT LONG SETUP
Entry Zone: 0.4000 – 0.4100
TP1: 0.4200
TP2: 0.4350
TP3: 0.4500
TP4: 0.4700
TP5: 0.4900
TP6: 0.5050
Stop Loss: 0.3850
The key level for me is the current support area. If WLD stabilizes and starts reclaiming resistance, the recovery could build step by step. If support b
post-image
WLD-3.28%
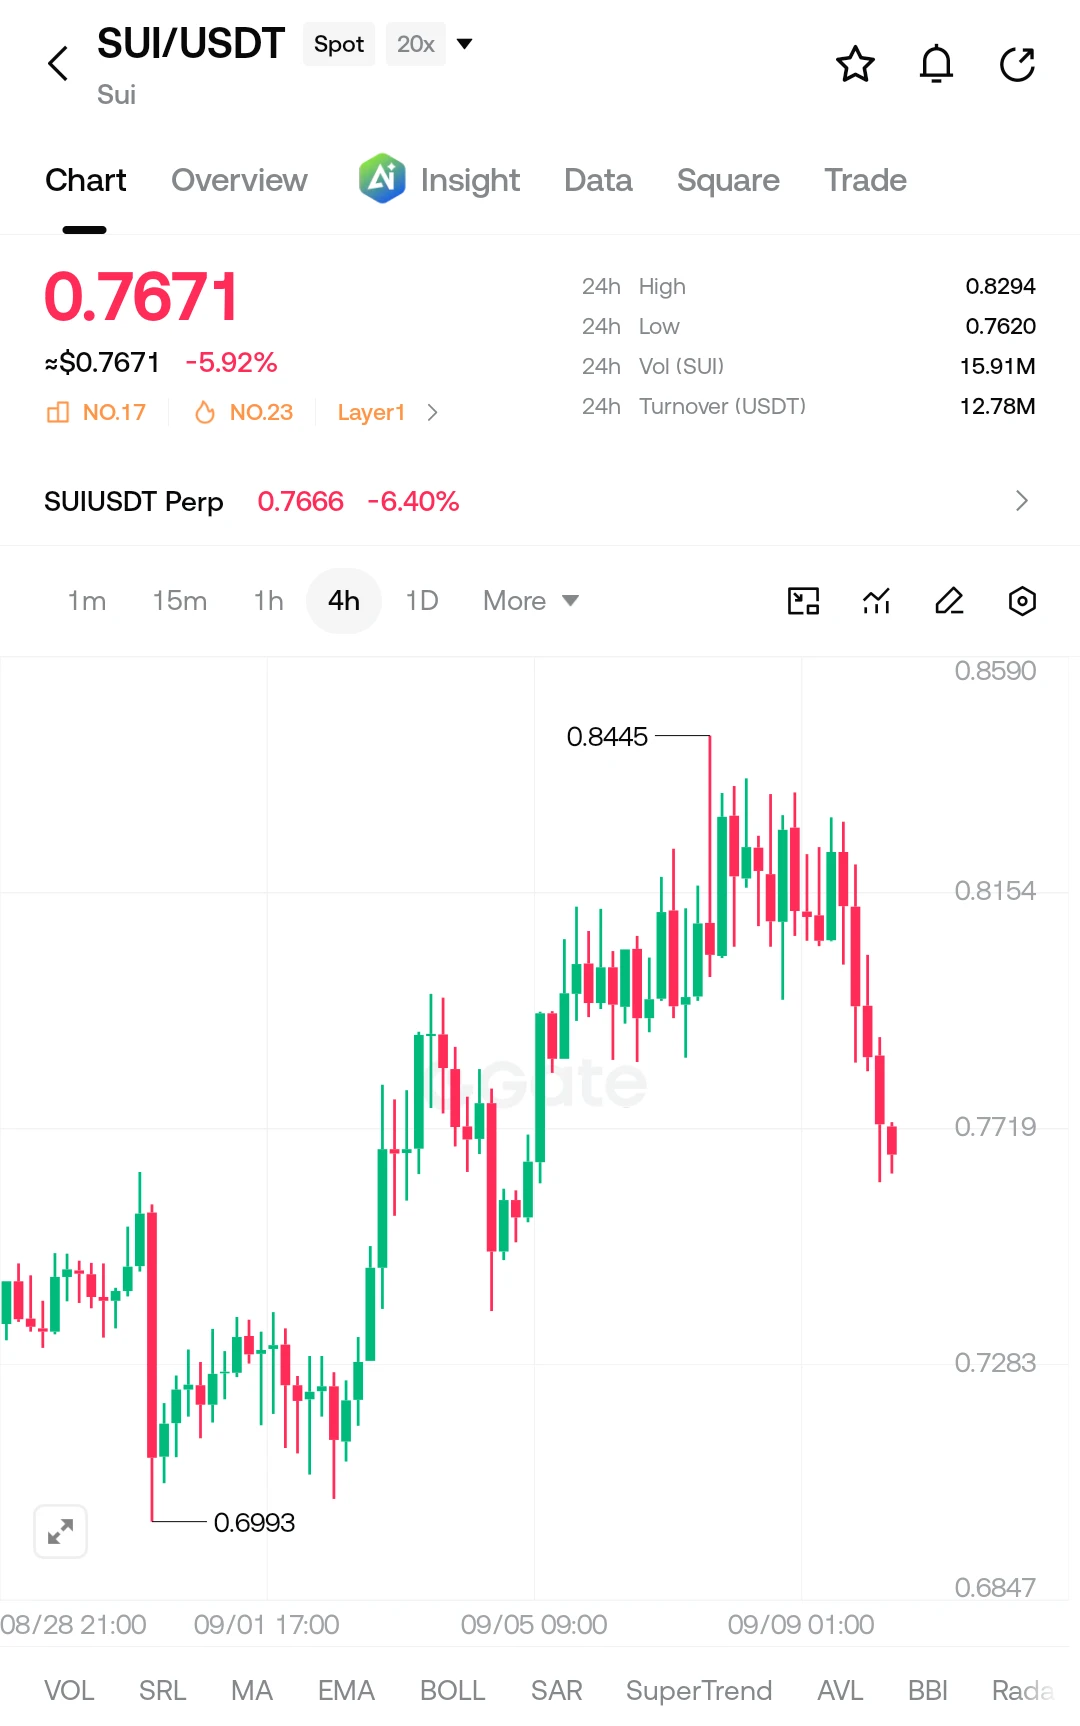
I’m watching $SUI /USDT closely here because this pullback is reaching an interesting decision zone.
Price is around 0.7671, after a strong rejection from the 0.8445 area. On the 4H chart, the recent selling pressure is aggressive, so I’m not chasing the move. I’m watching for a reaction around the current support zone before considering an entry.
SUI/USDT LONG SETUP
Entry Zone: 0.7600 – 0.7700
TP1: 0.7800
TP2: 0.7950
TP3: 0.8100
TP4: 0.8250
TP5: 0.8400
TP6: 0.8550
Stop Loss: 0.7480
My key focus is how price behaves around the entry zone. If buyers step in and reclaim the nearby resistance lev
post-image
SUI-3.17%
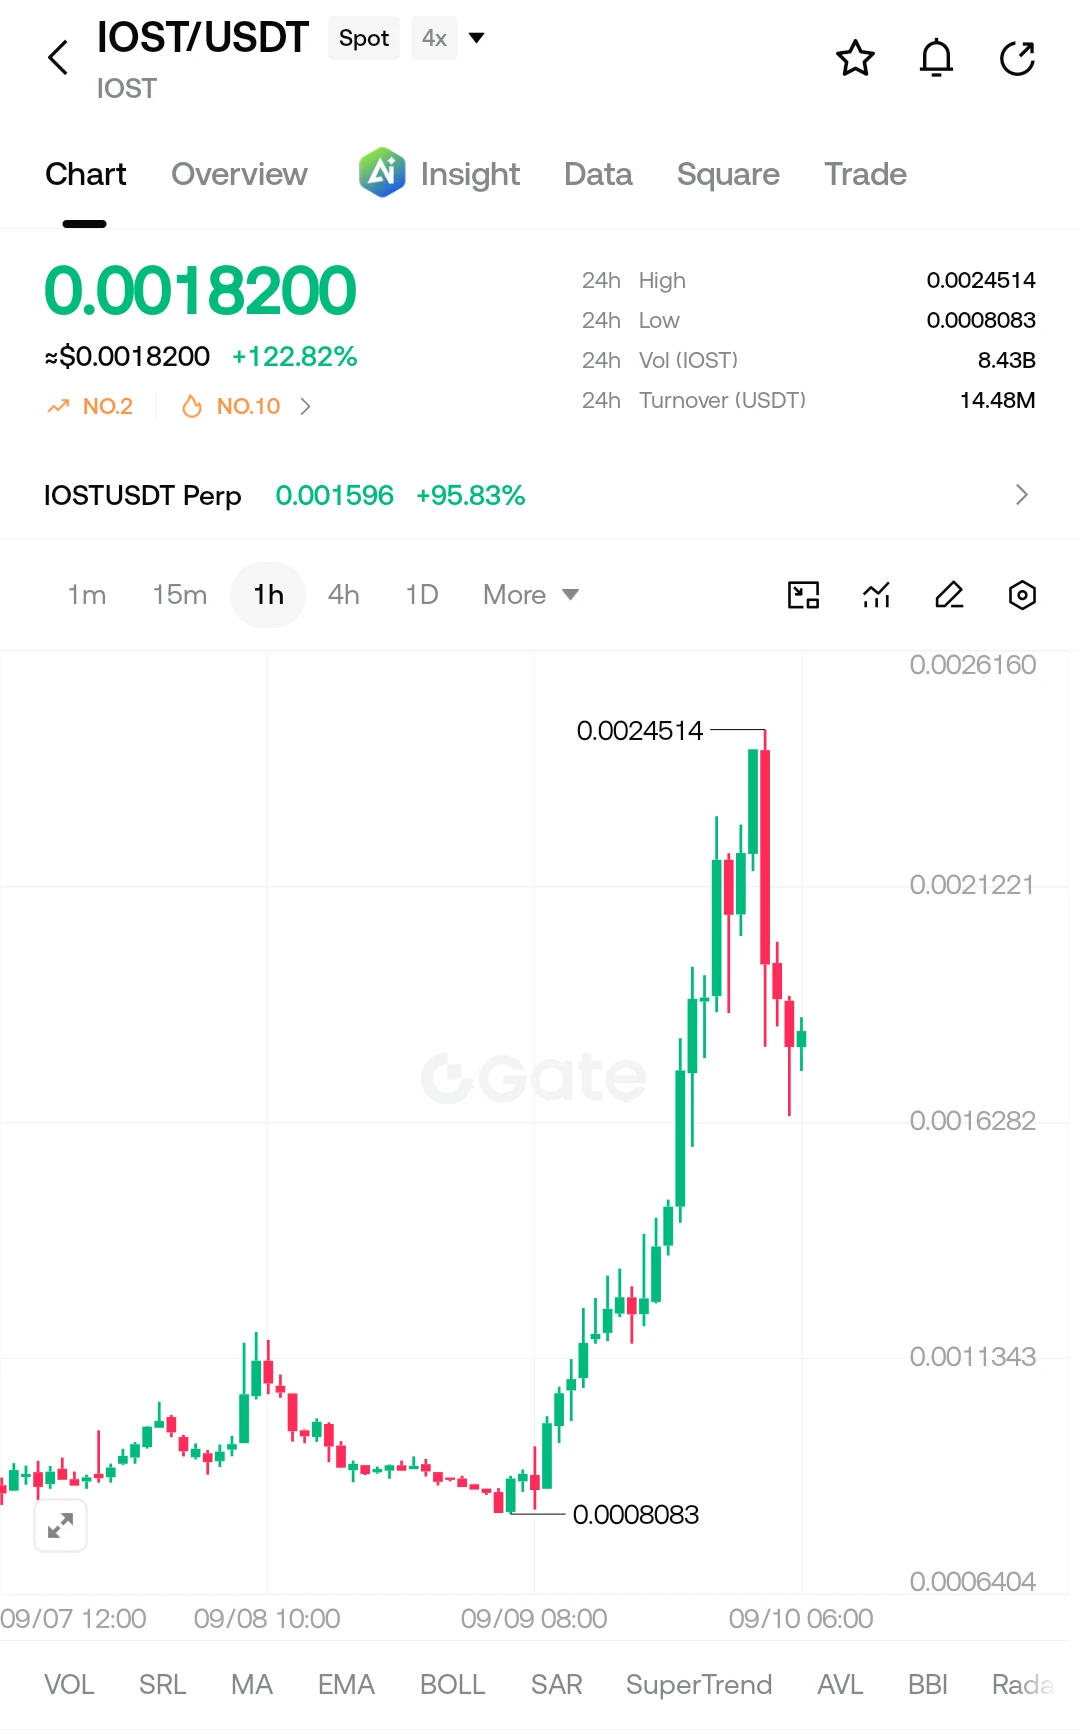
$IOST /USDT — I’m watching this one closely
I’m watching the 0.00180–0.00188 entry zone after that explosive move from the 0.00080 area. Price pushed into 0.00245, got rejected hard, and is now showing signs of cooling off.
If the rebound fails around the entry zone, I’m watching this setup for a possible SHORT continuation:
Entry Zone: 0.00180 – 0.00188
TP1: 0.00172
TP2: 0.00163
TP3: 0.00155
TP4: 0.00142
TP5: 0.00130
TP6: 0.00113
Stop Loss: 0.00205
The key for me is confirmation. I don’t want to blindly short a falling candle. If price reclaims the resistance zone with strong volume, I’d rath
post-image
IOST+5.29%
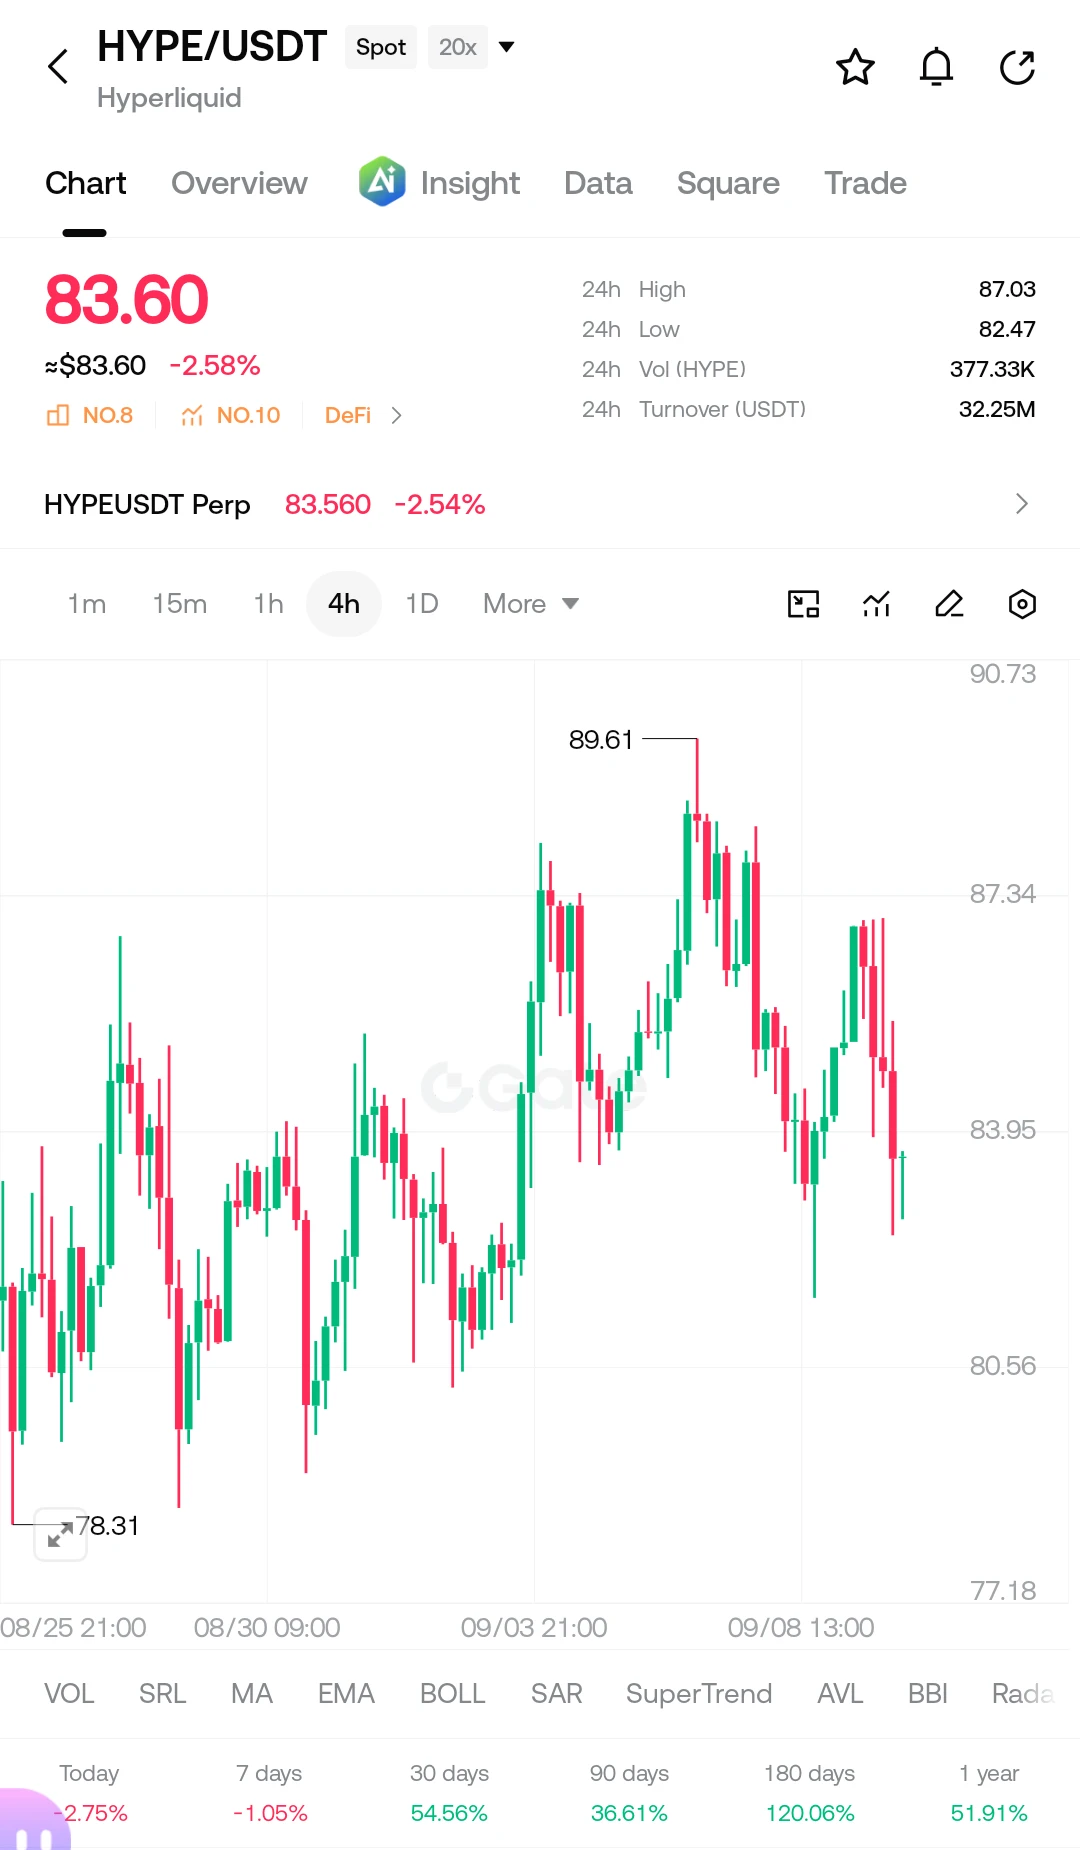
I'm watching $HYPE /USDT closely here. Price is sitting near a key support area after rejecting the 87+ zone, so I’m waiting for confirmation rather than chasing the move.
HYPE/USDT Long Setup
Entry Zone: $82.80 – $84.00
TP1: $85.20
TP2: $87.00
TP3: $89.00
TP4: $90.70
TP5: $93.00
TP6: $96.00
Stop Loss: $80.50
The interesting part is the reaction around $82–84. If buyers defend this area and reclaim $85, momentum could start building toward the previous highs. But if $82 breaks with strong selling pressure, I would step aside and wait for a cleaner setup.
I’m watching the confirmation, not forc
post-image
HYPE-1.52%
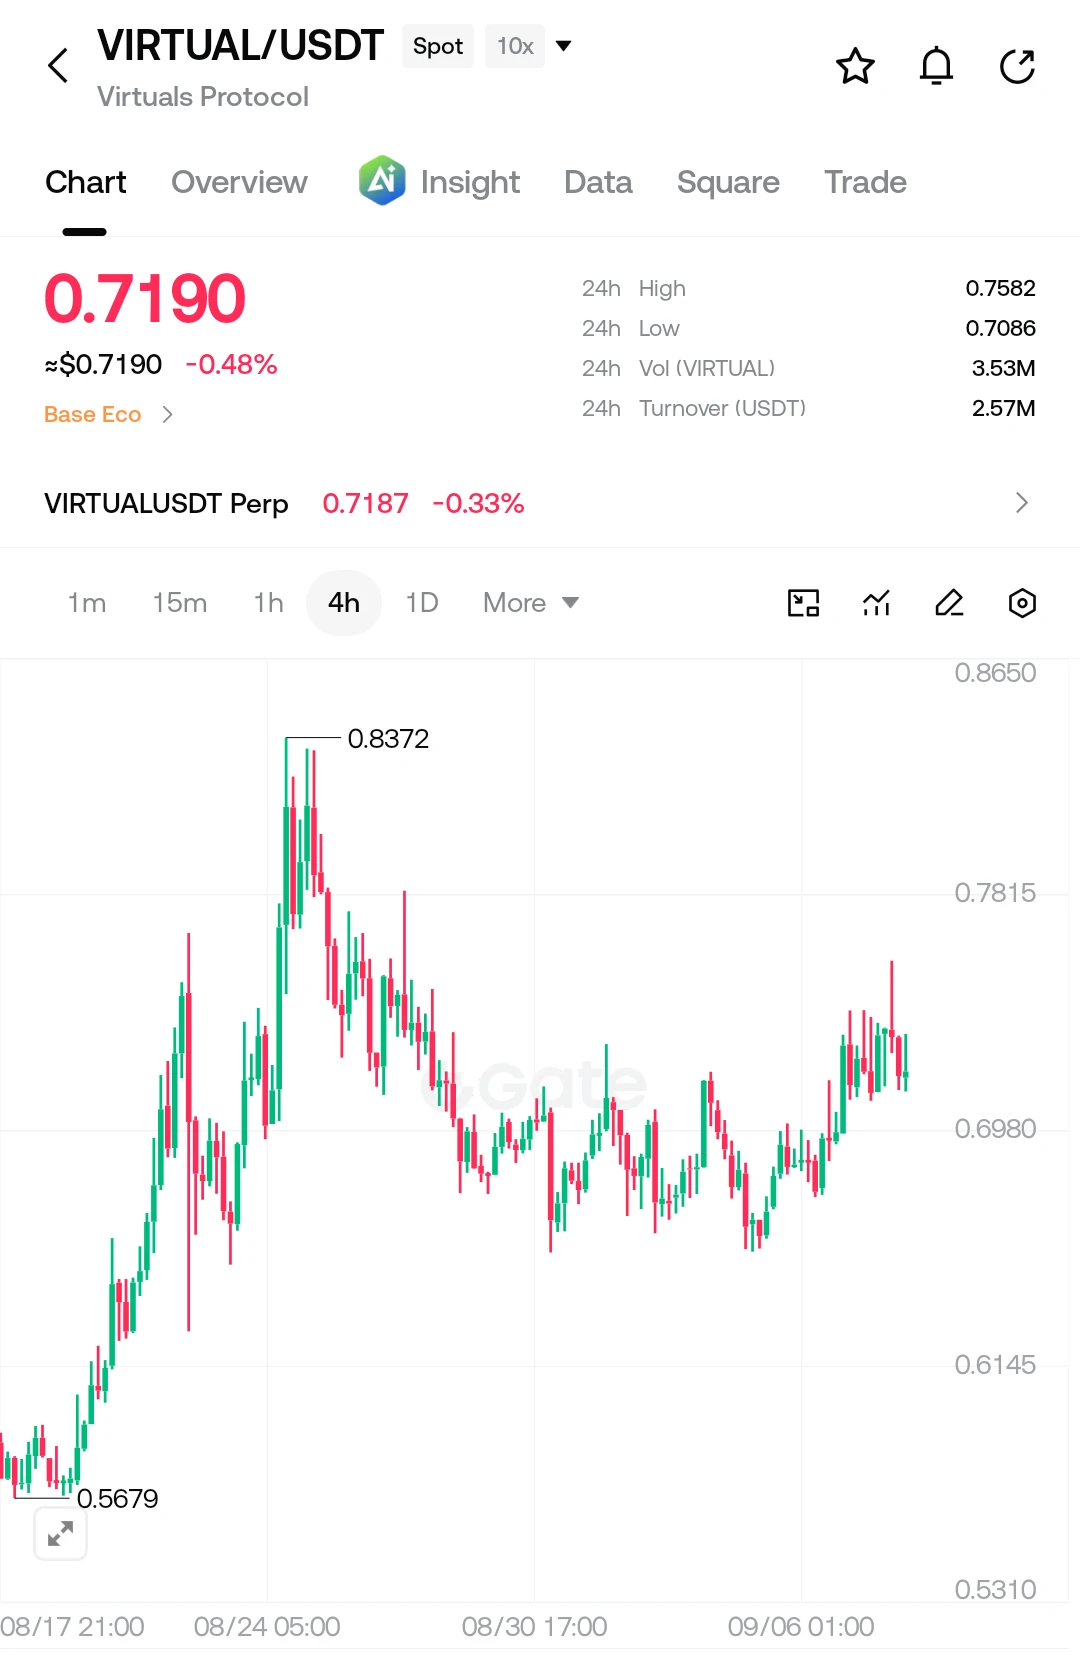
I’m watching $VIRTUAL /USDT closely here. Price is holding above the recent support zone and the 4H structure is starting to look interesting again. I’m not chasing the move; I’m watching for a clean entry and confirmation around the current area.
VIRTUAL/USDT LONG SETUP
Entry Zone: 0.710 – 0.725
TP1: 0.740
TP2: 0.758
TP3: 0.781
TP4: 0.810
TP5: 0.837
TP6: 0.865
Stop Loss: 0.690
The idea is simple: if VIRTUAL keeps defending the 0.710–0.725 area and buyers push through the nearby resistance, momentum could start expanding toward the previous swing highs.
I’d watch the reaction at each target in
post-image
VIRTUAL-3.23%
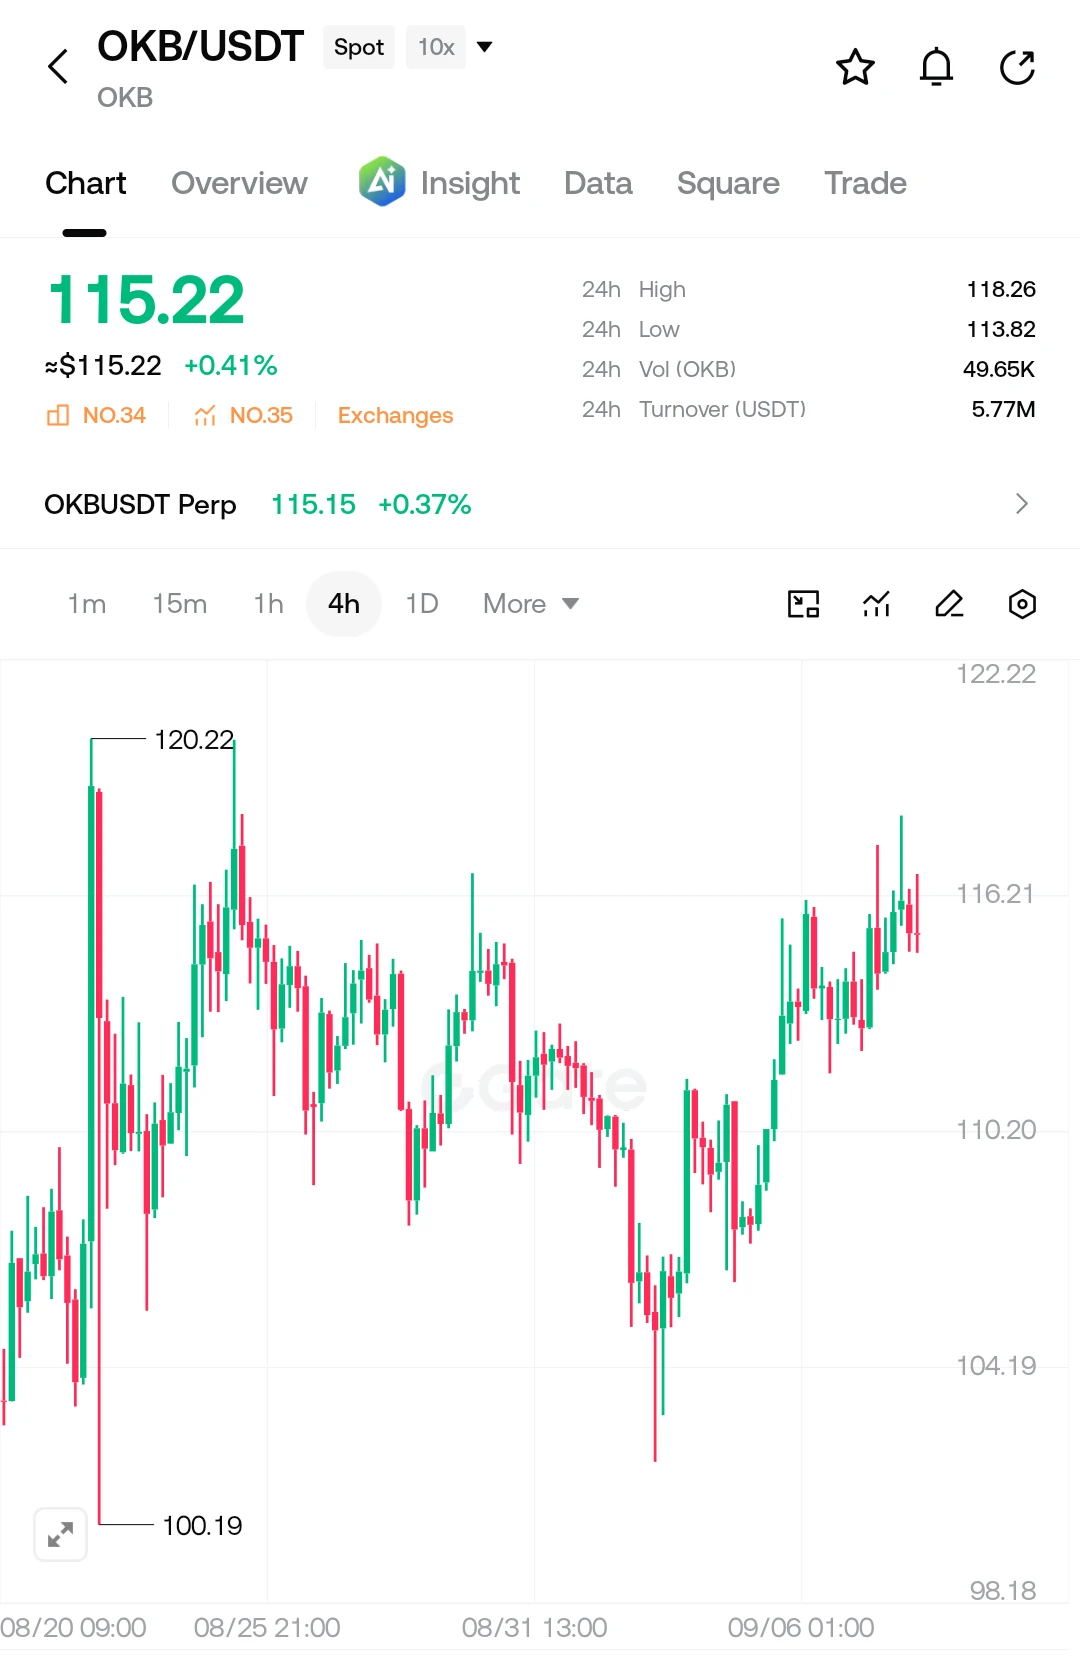
I’m watching $OKB closely here because price is pressing back into the 116 resistance area after a strong recovery from the 104–106 zone. I’m not chasing the move; I’m waiting for a clean entry and confirmation.
OKB/USDT — LONG SETUP
Entry Zone: 114.50 – 115.40
TP1: 116.20
TP2: 117.20
TP3: 118.20
TP4: 119.20
TP5: 120.20
TP6: 122.20
Stop Loss: 112.80
The key level for me is 116.20. A strong 4H breakout and hold above this area could open the way toward the previous 118–120 resistance zone. If price gets rejected and loses the entry area, I would rather step aside than force the trade.
Trade ide
post-image
OKB-2.28%
  • 2
  • 2
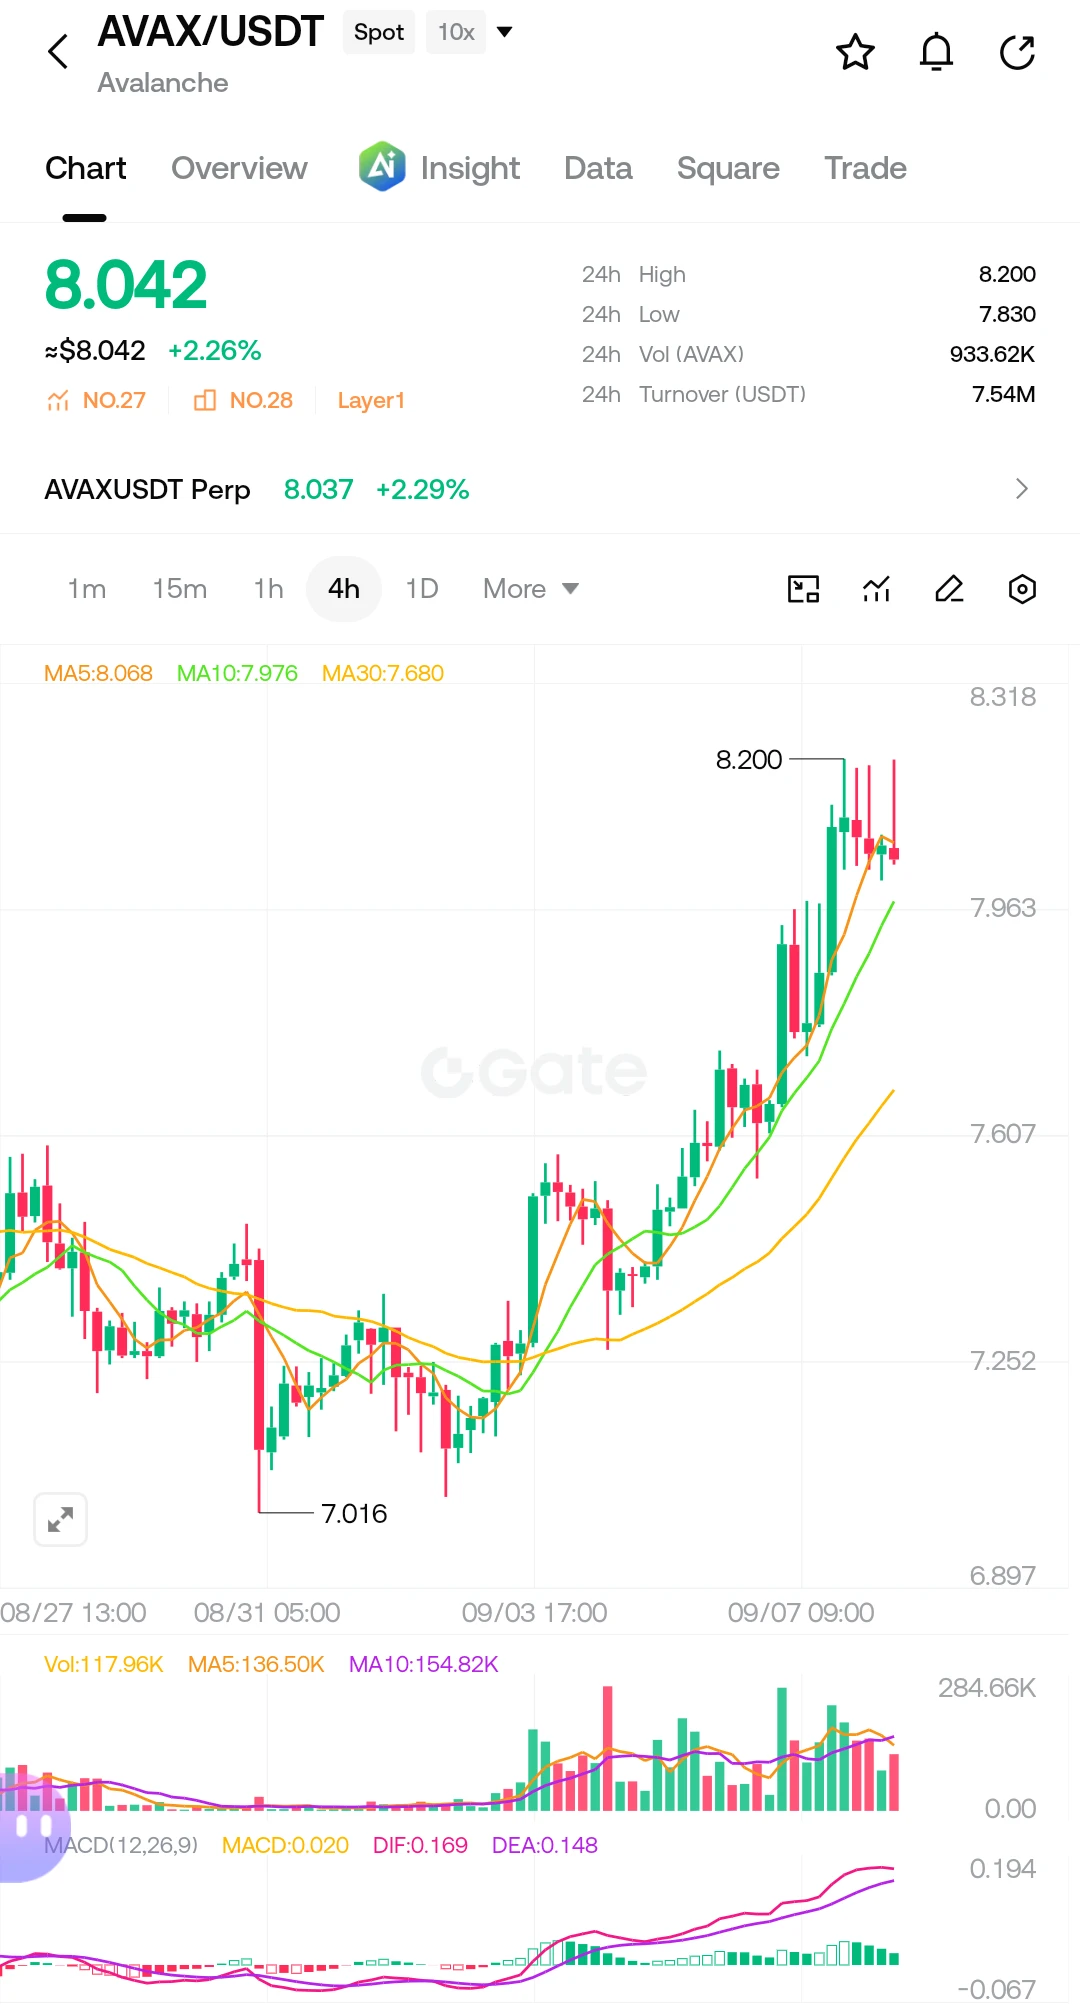
I’m watching $AVAX /USDT closely here the 4H chart is showing strong momentum, but price is now pressing into the 8.20 resistance area. I don’t want to chase the candle; I’m watching for a clean entry or a confirmed breakout.
AVAX/USDT — LONG SETUP
Entry Zone: 7.98 – 8.05
TP1: 8.12
TP2: 8.20
TP3: 8.32
TP4: 8.45
TP5: 8.60
TP6: 8.75
Stop Loss: 7.82
The structure remains bullish while AVAX holds above the short-term support zone. A strong 4H close above 8.20 could open the door toward the higher targets, while rejection there could bring a pullback toward the entry zone.
My approach here: patien
post-image
AVAX-3.51%
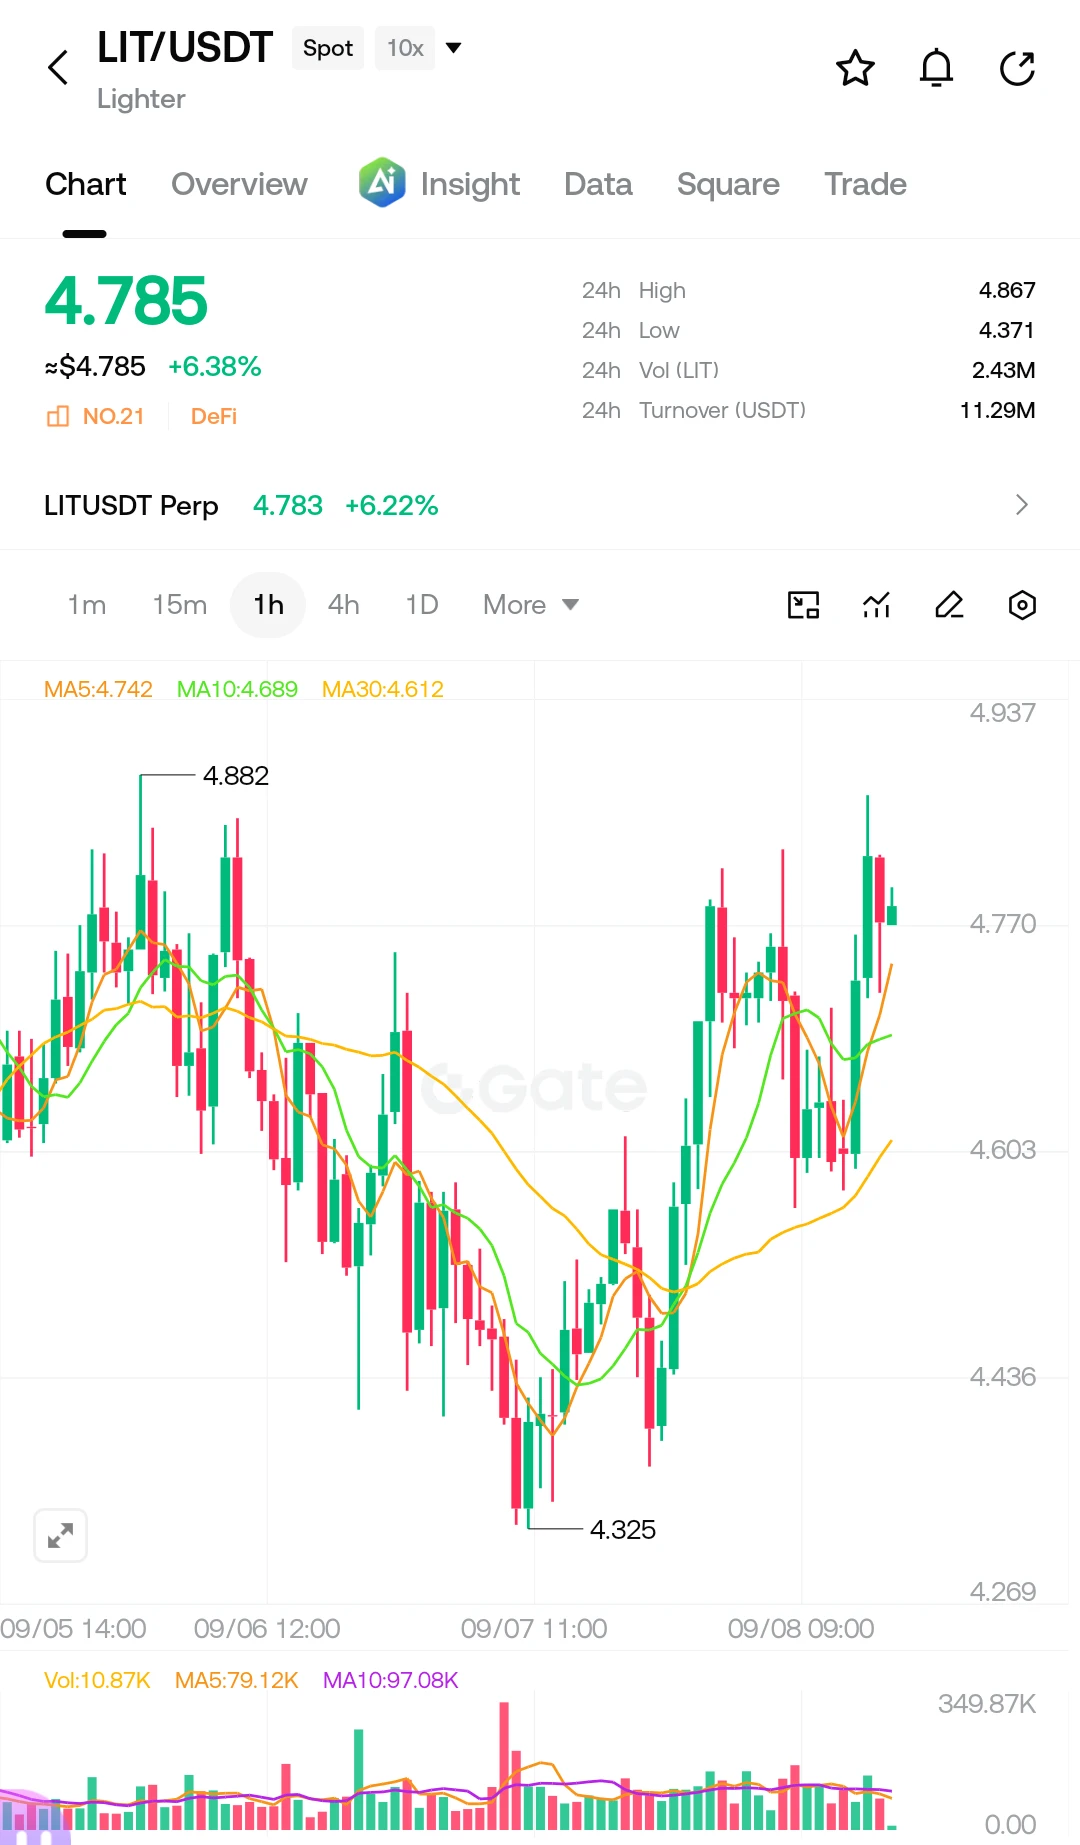
I’m watching $LIT /USDT closely right now 👀 — the 1H chart is showing a strong recovery from the 4.325 low, and price is holding above the short-term moving averages. The next battle is around the 4.80–4.88 resistance zone. 🔥
⚡ LIT/USDT — LONG SETUP
🟢 Entry Zone: 4.72 – 4.78
🎯 TP1: 4.82
🎯 TP2: 4.87
🎯 TP3: 4.93
🎯 TP4: 5.00
🎯 TP5: 5.08
🎯 TP6: 5.18
🛑 STOP LOSS: 4.60
💡 Pro move: Don’t chase a sudden green candle. I’d rather see price hold the entry zone and confirm support before adding. If TP1 hits, consider securing some profit and moving the stop toward breakeven.
The chart looks bul
post-image
LIT-2.82%
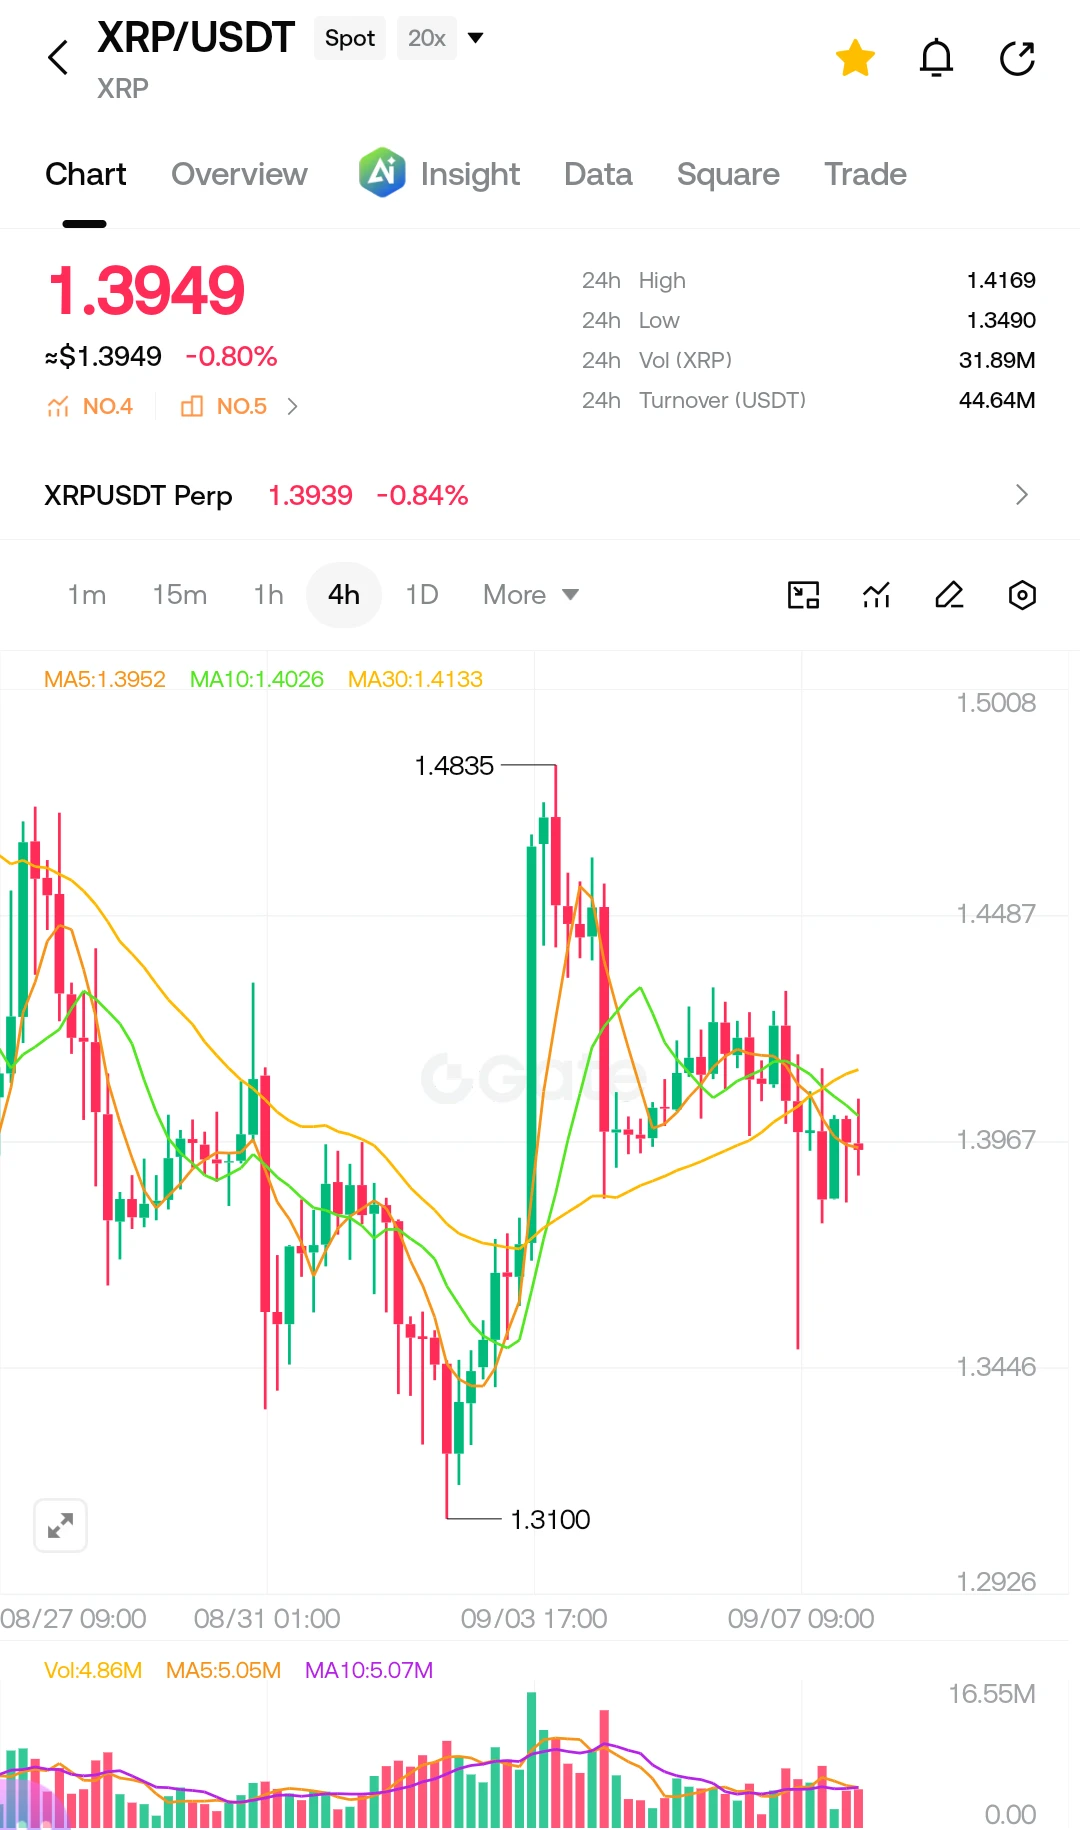
I’m watching $XRP closely here because this chart feels like one of those moments where patience matters more than chasing candles.
The 4H structure is losing momentum around the 1.40 area, while XRP is trading below the 10 MA and 30 MA. If resistance holds, I’m looking for a controlled short setup rather than entering in the middle of the move.
XRP/USDT — SHORT SETUP
Entry Zone: 1.400 – 1.410
TP1: 1.390
TP2: 1.375
TP3: 1.350
Stop Loss: 1.425
Pro Tips:
• Don’t chase the entry if XRP drops sharply before reaching the zone.
• Watch the 1.41–1.42 area closely; a strong 4H breakout above it can in
post-image
XRP-8.00%
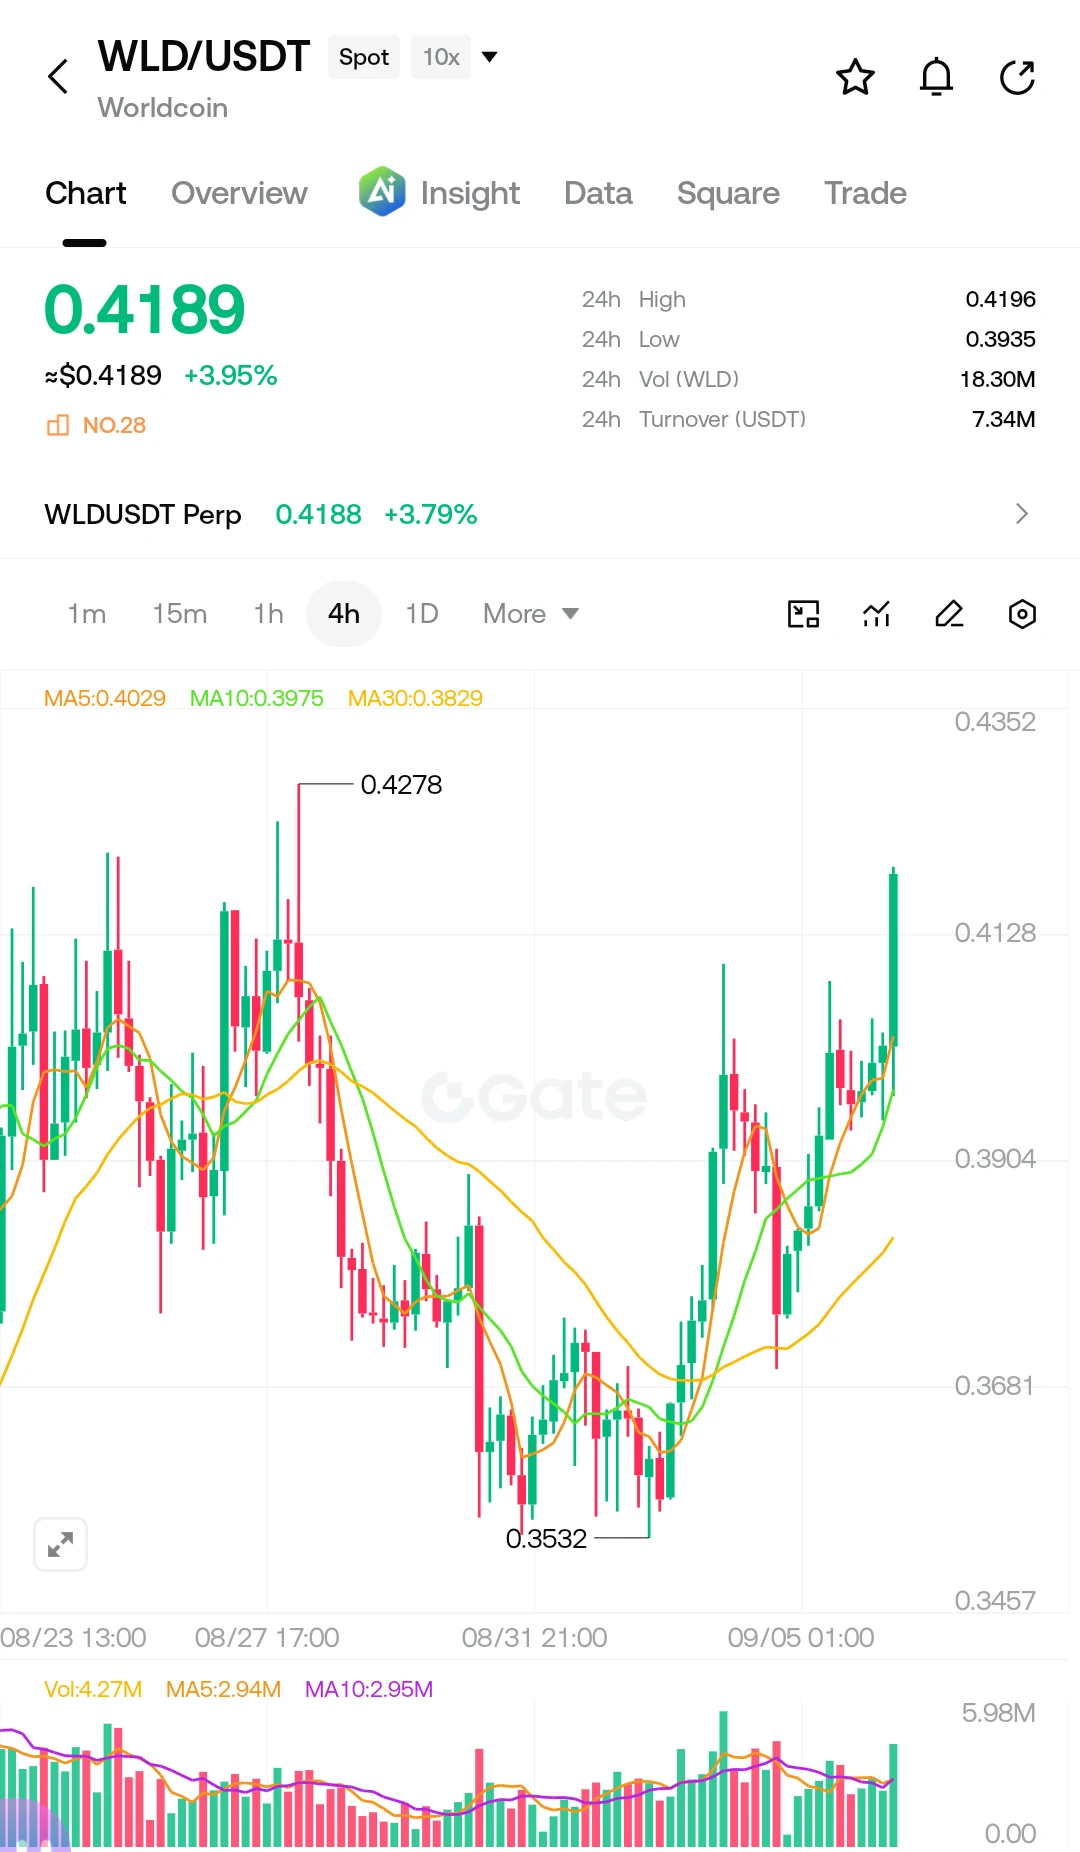
$WLD is showing strong bullish momentum on the 4H timeframe. Price has reclaimed the short-term moving averages and is trading above the 0.40 area, while the recent breakout suggests buyers are gaining control.
Direction: LONG
Entry Zone: 0.4020 – 0.4100
Take Profit: TP1: 0.4195
TP2: 0.4278
TP3: 0.4350
TP4: 0.4450
Stop Loss: 0.3930
Leverage: 10x maximum
The key level is 0.40. If WLD holds above this area after a pullback, the bullish continuation remains valid. A decisive break below 0.3930 would invalidate the setup.
Use controlled leverage and proper risk management.
$WLD ‌
post-image
WLD-3.28%
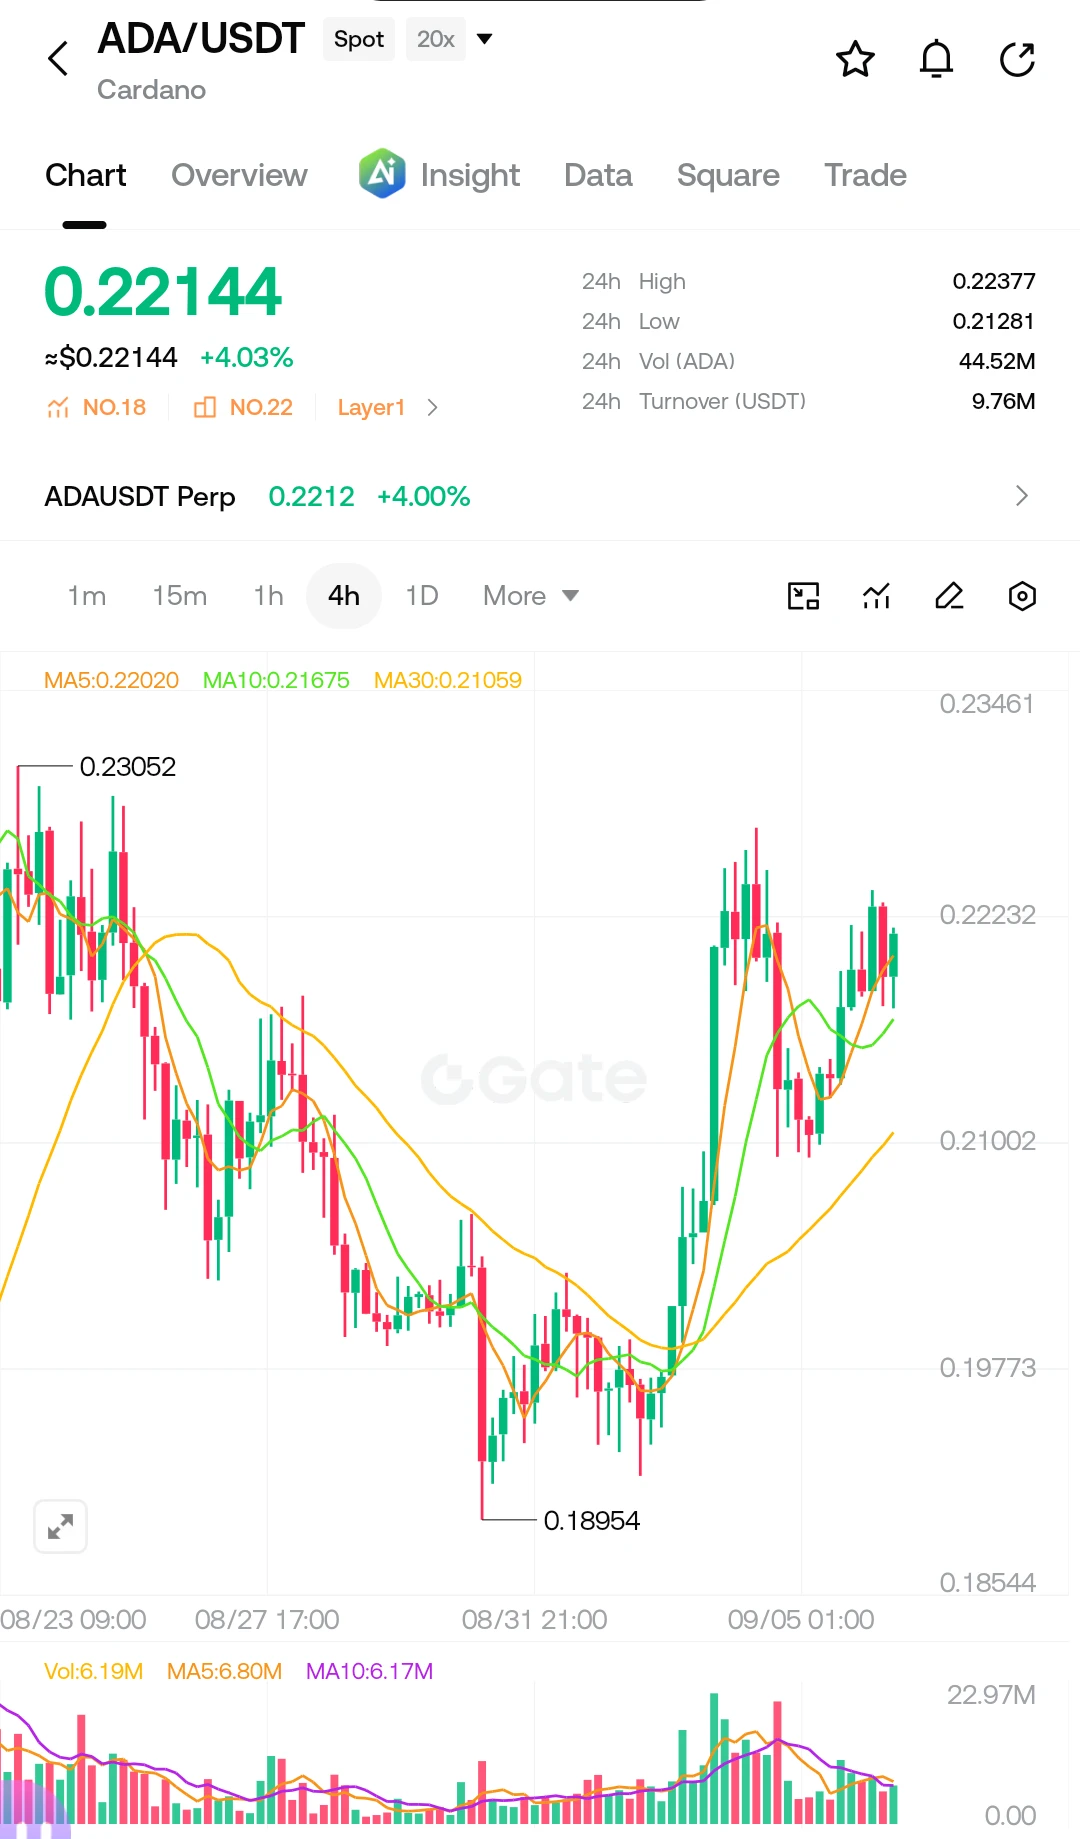
$ADA is showing a clear recovery structure on the 4H chart after bouncing strongly from the 0.1895 area. Price is now trading above the 5, 10 and 30-period moving averages, which keeps the short-term structure bullish.
The key area to watch is 0.2165–0.2180. As long as ADA holds this zone, another push toward the recent resistance levels is possible.
Direction: LONG
Entry Zone: 0.2165 – 0.2190
Take Profit: TP1: 0.2238
TP2: 0.2265
TP3: 0.2305
TP4: 0.2345
Stop Loss: 0.2100
Leverage: 10x–20x maximum
The main confirmation would be a strong 4H hold above the entry zone. If 0.2100 breaks decisively,
post-image
ADA-5.49%
🟢 $ONDO is quietly setting up and that’s exactly what caught my eye.
I’m not interested in the noise around this chart. The interesting part is the reclaim: price has pushed back above the short-term averages after defending the lower range. Now I’m watching whether buyers can turn this bounce into a proper continuation.
Trade Map 👇
🎯 Entry Zone: 0.3600 – 0.3650
🚀 TP1: 0.3720
🚀 TP2: 0.3800
🚀 TP3: 0.3900
⛔ Stop Loss: 0.3530
The 0.3720 area is the first real test. A clean break with volume could open the door toward the higher targets. If price loses the entry structure, I’d rather step as
ONDO-6.32%
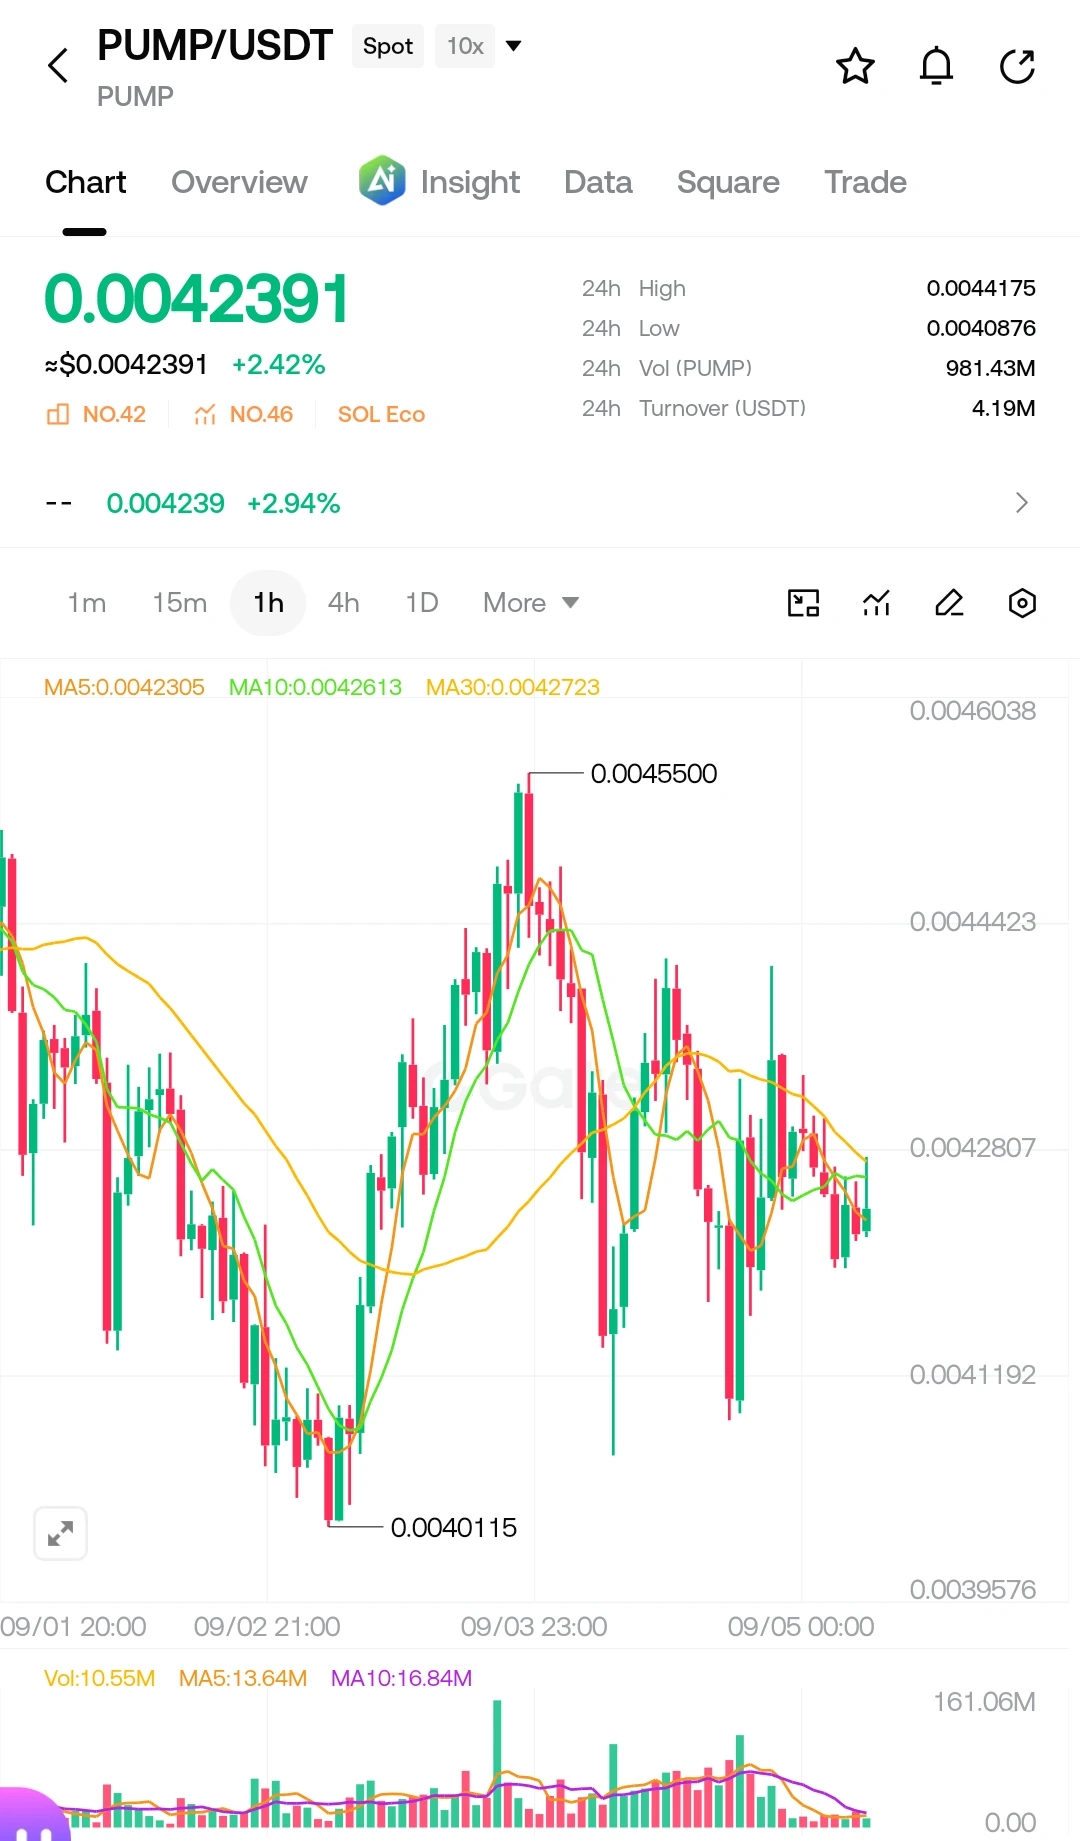
👀 I’m watching $PUMP /USDT, and this one is getting interesting.
PUMP is moving inside a tight range after the recent swings. Price is holding around $0.00424, while the chart shows buyers trying to defend the lower area. For me, the key is a clean push above the nearby resistance rather than chasing random candles.
📍 Entry Zone: $0.00420 – $0.00428
🎯 TP1: $0.00440
🎯 TP2: $0.00455
🎯 TP3: $0.00470
🛑 Stop Loss: $0.00408
If momentum returns with volume, that previous $0.00455 high becomes an important level to watch. ⚡📈
I’d keep the position controlled, take partial profits along the way,
post-image
PUMP-2.46%
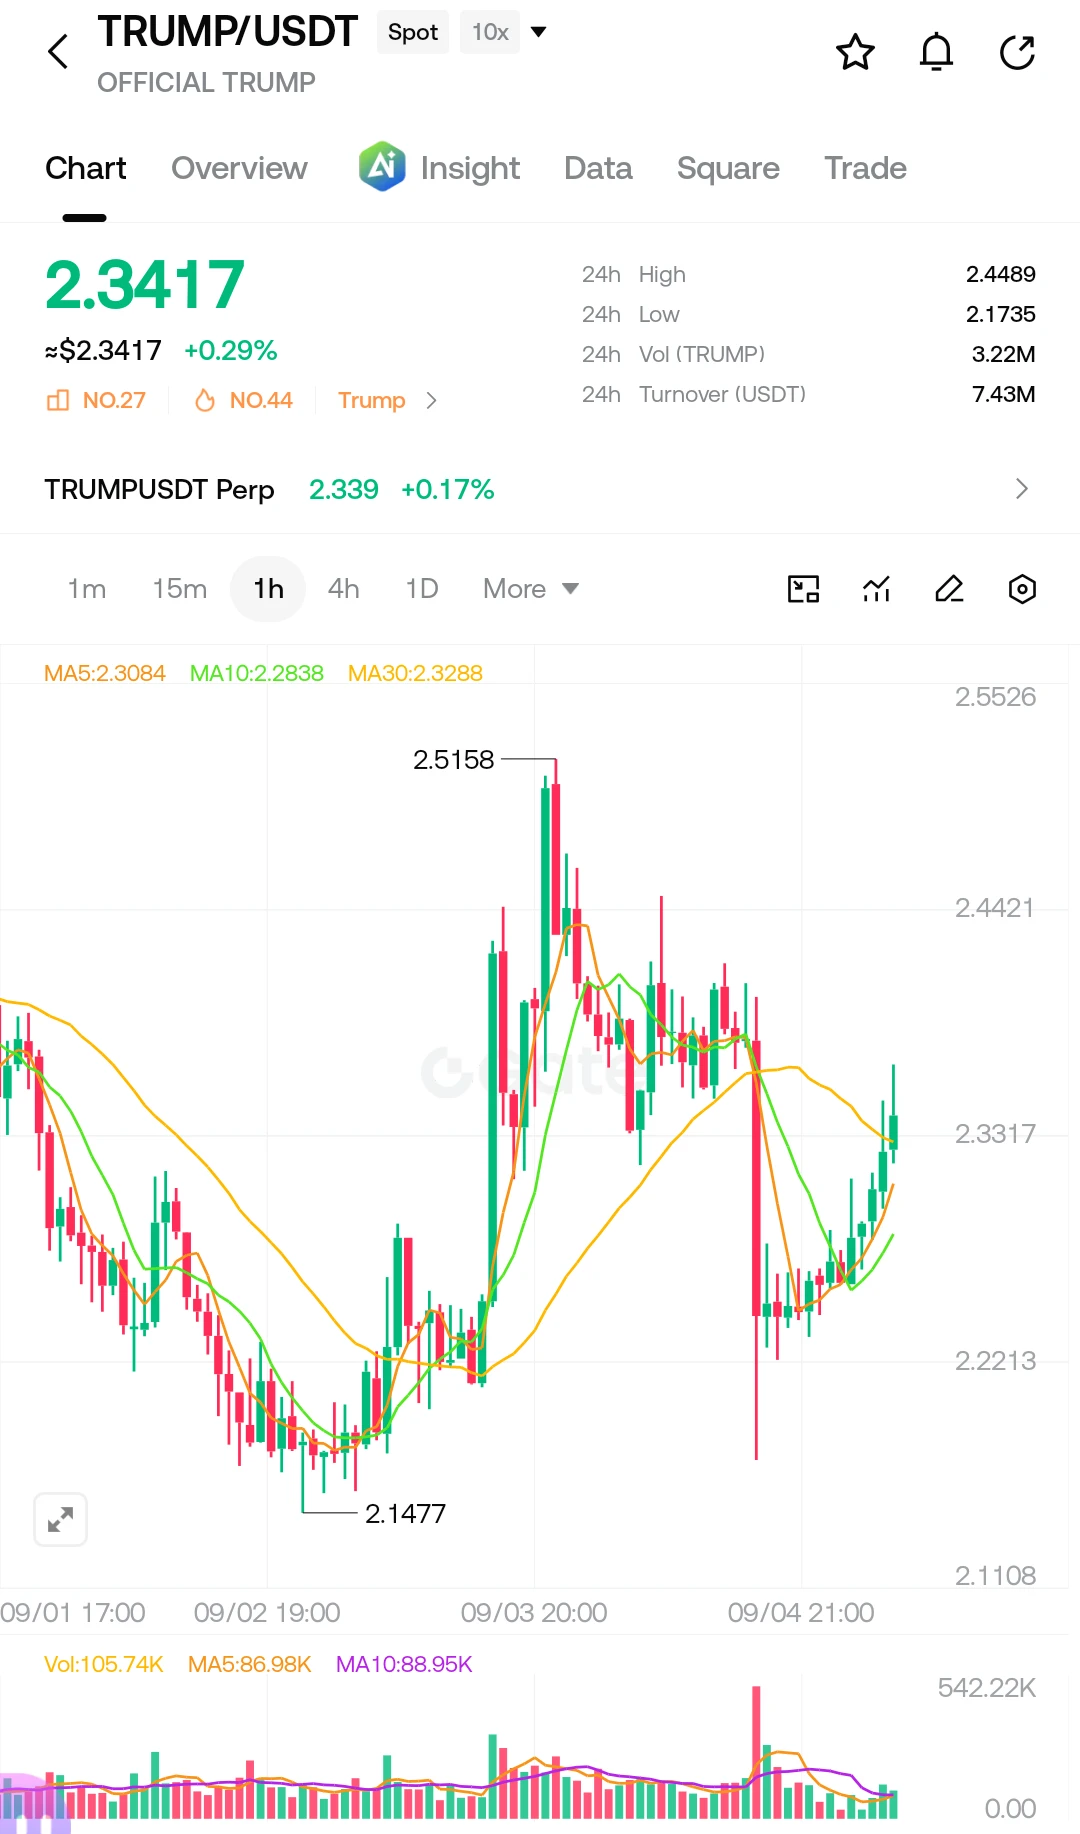
👀 I’m keeping $TRUMP /USDT on my radar here.
The chart looks like it’s trying to build momentum again after that sharp flush. Price has climbed back above the short-term moving averages, but I’m not chasing the move I want to see buyers prove they can hold the breakout area.
📍 Entry Zone: $2.30 – $2.34
🎯 TP1: $2.42
🎯 TP2: $2.50
🎯 TP3: $2.58
🛑 Stop Loss: $2.24
If $2.34 holds as support, the next push toward the previous resistance zone could get interesting. ⚡
My approach: patience on the entry, partial profits on the way up, and strict risk control if the setup breaks down.
⚠️ Disclaime
post-image
TRUMP-5.21%
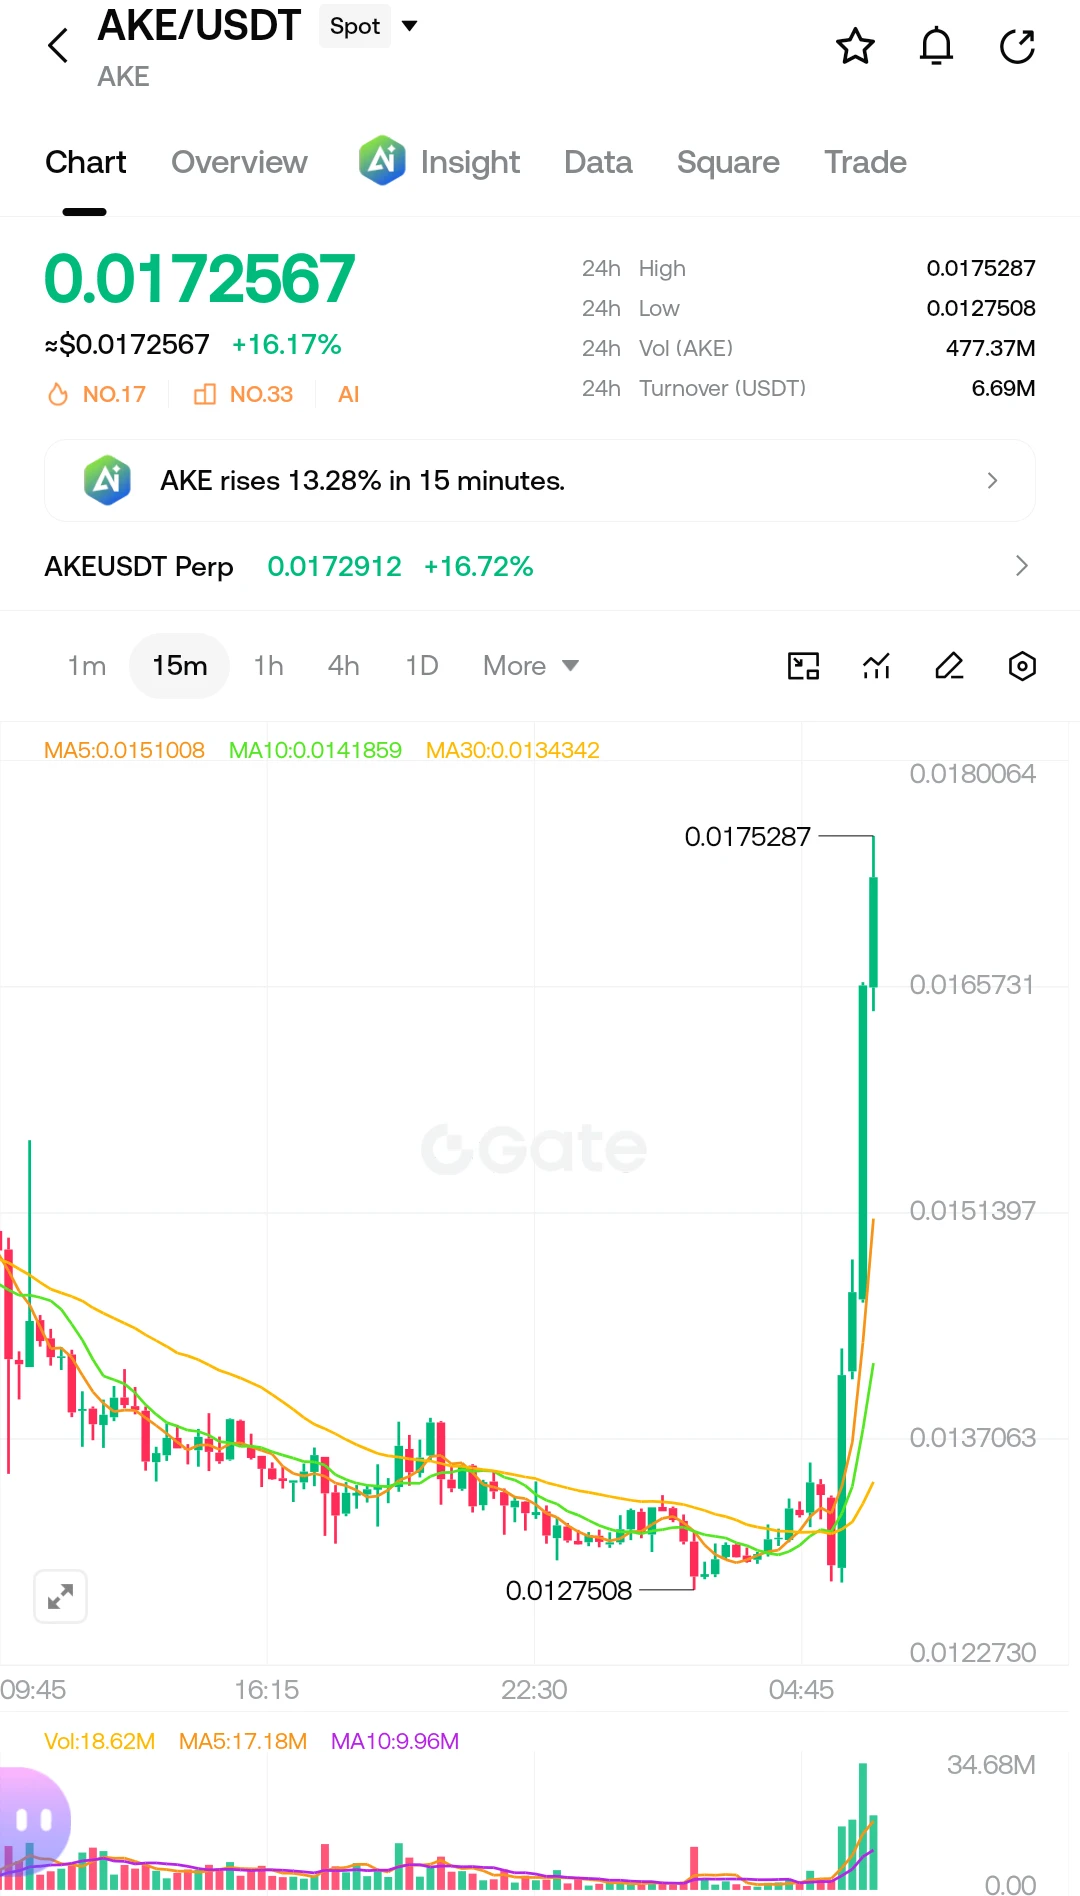
🔥 I’m watching $AKE /USDT closely right now…
This chart just woke up! 🚀 AKE has exploded out of its consolidation with strong momentum + heavy volume, pushing toward the 0.01752 area. I don’t want to chase the candle blindly I’m watching for a controlled entry/retest.
📍 Entry Zone: 0.01620 – 0.01680
🎯 TP1: 0.01750
🎯 TP2: 0.01820
🎯 TP3: 0.01900
🛑 Stop Loss: 0.01540
The key now is whether buyers can hold above the breakout zone. If the retest holds, another leg higher could be on the table. ⚡📈
Trade smart: don’t FOMO into a vertical candle, manage your risk, and consider taking partial
post-image
AKE+39.61%