The most important check is matching environments end to end: testnet endpoints with testnet assets, mainnet endpoints with mainnet assets, and HyperEVM as the source of HYPE gas rather than inventing a new fee token. This step-by-step guide focuses on wallet connection and bridging; the explainer on what is Elysium covers Orbit settlement, HyperCore staging, and launch trust assumptions. For most wallets the setup is easy once chain settings and bridge information are copied from primary docs.
Key Takeaways
-
Elysium is an Arbitrum Orbit L2; wallets need the correct chain ID, currency symbol HYPE, and an RPC endpoint.
-
Documented testnet chain ID is 99801; mainnet chain ID is 99901, settling to HyperEVM 999.
-
HYPE bridges from HyperEVM 1:1 as native gas with no wrapper required solely to pay fees.
-
Prefer provider RPCs for production traffic; shared public RPCs can be rate-limited.
-
Wrong-network transfers and mismatched testnet/mainnet bridges are the most common irreversible mistakes.
What Do You Need, Including the Gas Token, Before Connecting to Elysium?
Prepare an EVM-compatible wallet that can add custom networks, a small amount of HYPE already available on HyperEVM for the environment you intend to use, and the official network table from Elysium docs. For builders, Alchemy is documented as a recommended RPC provider; other node providers also publish Elysium endpoints. Keep that network information ready in a second screen so you can copy chain ID and RPC values without guessing.
Confirm whether you are using testnet or mainnet. Testnet reuses the same stack shape as mainnet but different endpoints and addresses. Do not mix explorers, test assets, or bridge UIs across environments. Budget a few minutes to verify each field before the first bridge attempt.
Also confirm that the wallet address you will use on Elysium is the address you control for bridging. Bridging moves HYPE into native gas on Elysium; it does not create a second speculative gas token. If you still have open questions about settlement roles versus HyperEVM, finish the Elysium overview first, then return to this guide.
Step 1: How Do You Add the Elysium Network to a Wallet?
Open your wallet’s network settings and add a custom network—or use an Add Elysium network action if your wallet or docs portal exposes a one-click deep link. Use the published chain ID for the environment you need: testnet 99801 or mainnet 99901. Set the currency symbol to HYPE. Paste an RPC URL from a documented provider app or from the public endpoint list in Connecting to Elysium docs. Treat the network form as its own section: chain ID, currency or native gas token, RPC, and optional explorer each need exact details, whether you add the network manually or use a one-click option.
For WebSocket subscriptions or indexing, use the matching WSS endpoint from the same provider app rather than inventing a URL. If the wallet supports an explorer field, use the published explorer for that environment once it is live; mainnet explorer availability may lag launch. Elysium mainnet RPC and chain settings should come from the live docs table on elysium.kinetiq.xyz, not from undated screenshots or unrelated “Elysium” chains that use different gas tokens.
After saving, switch the wallet to Elysium and confirm the network name and chain ID match the docs row you copied. If the wallet shows a different chain ID, delete the network entry and re-add it from primary documentation instead of a screenshot. Taking a minute here prevents later “wrong chain” bridge failures.
Step 2: How Do You Choose an RPC Endpoint Safely?
Public RPCs such as the documented testnet public endpoint are shared by everyone and are fine for light checks. Production dApps and frequent traders should create a provider app key (for example Alchemy’s Elysium app) so traffic is not competing on a shared public URL. Provider dashboards usually show a dedicated section for HTTPS and WebSocket URLs so you can select the pair that matches your tooling. Elysium’s stock ArbOS environment supports familiar EVM tooling such as MetaMask, Foundry, Hardhat, and Remix-style workflows.
Archive endpoints matter if you need historical reads or indexing. Prefer providers that explicitly list Elysium support for the environment you are on, since stronger RPC infrastructure helps apps scale without relying on a shared public URL. Never paste API keys into public chats or commit them to repositories. Store provider information in a password manager rather than a public note.
If RPC calls fail with chain-id mismatch errors, the wallet is pointed at the wrong network or the RPC belongs to a different chain. Fix the network entry before retrying bridges or contract calls. When the endpoint is ready and eth_chainId returns the expected value (99801 or 99901), you can move to bridging without guessing; on a healthy endpoint, recent blocks should advance over a short wait.
Step 3: How Do You Bridge HYPE from HyperEVM to Elysium?
Start with HYPE on HyperEVM for the matching environment (HyperEVM testnet chain ID 998 for Elysium testnet; HyperEVM mainnet chain ID 999 for Elysium mainnet). Open the official bridging path described in Elysium token-bridging docs rather than a random third-party “bridge aggregator” page that only mentions the brand name. If assets still sit on another chain, move them to HyperEVM first through a route you trust, then use the official HyperEVM→Elysium HYPE bridge. Bridging directly through documented routes reduces the chance of approving a look-alike contract.
Bridge HYPE so it arrives as native gas on Elysium at a 1:1 ratio. There is no separate wrapper token required solely to pay fees. After the bridge confirms, switch the wallet to Elysium and verify the HYPE balance appears as the native currency, not as an arbitrary ERC-20 named similarly. Confirmation time varies by rollup batching; wait for the destination balance rather than assuming instant arrival.
Keep a small HyperEVM HYPE balance if you still need to pay for HyperEVM-side actions such as initiating withdrawals later. Bridging all HYPE away from HyperEVM can strand later settlement steps if those steps still require HyperEVM gas. If you need to bridge a HyperEVM token other than HYPE, follow the token-bridging architecture section in docs instead of reusing the gas-only mental model.
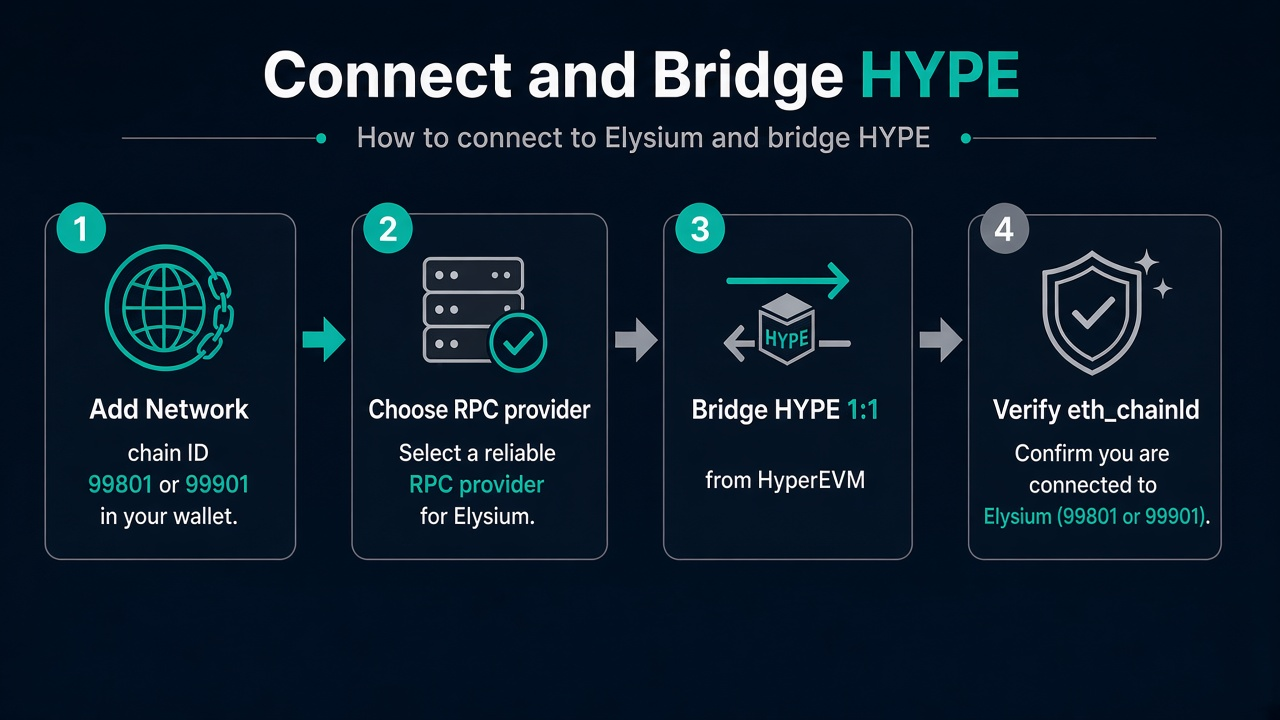 Figure 1. Four steps to connect to Elysium and bridge HYPE.
Step 4: How Do You Verify the Connection Before Using Apps?
Send a tiny self-transfer or call a read-only RPC method such as eth_chainId and eth_blockNumber against your selected endpoint. Confirm the returned chain ID matches 99801 or 99901 as intended. Confirm a recent block number advances over a short wait so you are not stuck on a stale private fork or misconfigured proxy, and check the expected gas fee before sending a test transaction. A two-minute verification section at this stage is cheaper than debugging a mis-signed approve later.
Only then approve spending or deploy contracts. For application testing, start with read-only interactions before signing unlimited allowances. If you are evaluating HyperCore-related features, confirm whether those precompiles are live for your environment; docs stage some HyperCore read/write capabilities after mainnet rather than at first block. Keep frequently asked questions from the FAQ section below handy while you test so you can re-check chain IDs without leaving the wallet.
What Common Errors Happen When Connecting or Bridging?
| Error |
Likely cause |
Fix |
| Balance missing after bridge |
Wallet still on HyperEVM or wrong Elysium env |
Switch network; confirm chain ID |
| Transaction stuck / underpriced |
Public RPC congestion or wrong fee fields |
Retry via provider RPC; refresh gas settings |
| Chain ID mismatch |
Custom network typed incorrectly |
Re-add network from official table |
| Bridged “HYPE” that is not gas |
Wrong token contract or fake UI |
Use official bridge docs; verify native gas |
| Testnet assets on mainnet UI |
Environment mix |
Reset to matching RPC, explorer, and bridge |
Wrong-network sends and phishing front-ends remain the highest-severity failures. Bookmark primary docs domains (elysium.kinetiq.xyz, kinetiq.xyz) and avoid connecting wallets to look-alike domains or unrelated chains that also use the “Elysium” name. When something looks off, stop and re-read the matching section of Connecting to Elysium rather than retrying blindly.
Is Connecting to Elysium Safe? What Should You Double-Check?
Connecting a wallet to an RPC does not by itself move funds; signing bridge and approve transactions does. Review spender addresses, bridge contracts, and chain IDs before confirming. Elysium’s rollup posture includes sequencer and DA operator assumptions described in the security docs—forced inclusion and withdrawal challenge periods are safeguards, not a reason to skip address checks.
If you later withdraw from Elysium back toward HyperEVM, expect optimistic-rollup timing rather than instant finality. Challenge-period time is a protocol parameter, not a wallet bug. Keep records of transaction hashes on both sides of the bridge so support or self-debugging can compare inclusion on Elysium and settlement on HyperEVM. Still have questions about custody on HyperCore versus balances on Elysium? HyperCore assets stay in your HyperCore account; Elysium connection does not replace that custody model.
Summary
Connecting to Elysium is a standard custom-network setup plus a HyperEVM→Elysium HYPE bridge. Match chain IDs to the environment, prefer documented RPC providers for real usage, bridge HYPE 1:1 as native gas, and verify eth_chainId before approving app spenders. Most losses in this flow come from environment mix-ups and fake bridge UIs, not from misunderstanding Orbit jargon. Use this guide as the operational checklist for Elysium mainnet RPC and chain settings, then return to the pillar when you need architecture context or answers about what is Elysium and what are its primary use cases.
What you need to know before leaving this page: HYPE is the gas token used for Elysium; bridging to Elysium starts from matching HyperEVM; and explorer or RPC links must match testnet versus mainnet. The FAQ section below repeats the same questions in shorter form for quick checks.
FAQ
How do I connect a wallet to Elysium?
Add a custom network using the published chain ID (testnet 99801 or mainnet 99901), set currency to HYPE, paste a documented RPC, then switch the wallet to that network. Copy values directly from the official Connecting to Elysium section so chain settings stay accurate. If a portal offers Add Elysium with one click, still verify the resulting chain ID before you bridge; alternatively, if one-click add is unavailable, enter the published details manually.
How do I bridge HYPE to Elysium?
Hold HYPE on the matching HyperEVM environment and use the official Elysium bridging path so HYPE arrives 1:1 as native gas on Elysium. Bridging usually takes a few minutes depending on batch inclusion; wait for the destination balance before spending.
What is the Elysium mainnet chain ID?
Docs list mainnet chain ID as 99901, settling to HyperEVM chain ID 999. Always re-check the live Connecting to Elysium table before adding a network, because RPC and explorer information can be published in stages.
Why does my HYPE balance not show after bridging?
The wallet may still be on HyperEVM, or you may be on the wrong Elysium environment. Switch networks and confirm the chain ID matches the bridge you used. If the destination network is ready and the hash shows success, refresh the wallet token list once.
Should I use the public RPC for trading apps?
Public RPCs are shared. For production or frequent trading traffic, create a provider endpoint so you are not limited by shared rate limits. Provider endpoints make it easier to keep HTTP and archive information in one place when apps ask operational questions about latency.